Showing posts with label Photo Prop Pattern. Show all posts
Thursday, January 19, 2017
Short Overalls for Newborns
Good afternoon lovelies!
Wow it's been a busy few weeks. We just got back from our first family vacation in 2 years! Woah! So much fun though, but not a lot of time for crochet, so I'm sorry we missed a week there.
Today's pattern is something that's been on my todo list for a long time, and has been requested a few times over the years. Short overalls! Oh my word, these are just all sorts of adorable! They would be great as everyday wear, but also fantastic as a photography prop!
The doll I use wears a cloth diaper too, so you know it'll fit over babies butt!
It's simple enough to make, but it does use the best part of a ball of Red Heart Super Saver, so make sure you have enough on hand. They have ribbing around the back of the waist and the legs to help with fit.
Short Overalls
Sized To Fit:
Newborn
You Will Need:
5mm hook
Worsted Weight Yarn. I used Red Heart Super Saver in Blue Tones
2 Buttons
1: Ch17, dc in the 3rd ch from hook and each across. -15dc 2cm wide. 11cm long
Count the starting chain as a stitch from here
2-4: Ch3, turn, dc in each stitch across. - 15dc, 6cm wide, 11cm long
5: Ch3, turn, dc in each stitch across, ch40, careful not to twist, join to the top of the ch3. - 55 stitches
6: Ch3, dc in the first 15 stitches, dc in the next 40 chains, join to the top of the ch3. 55dc
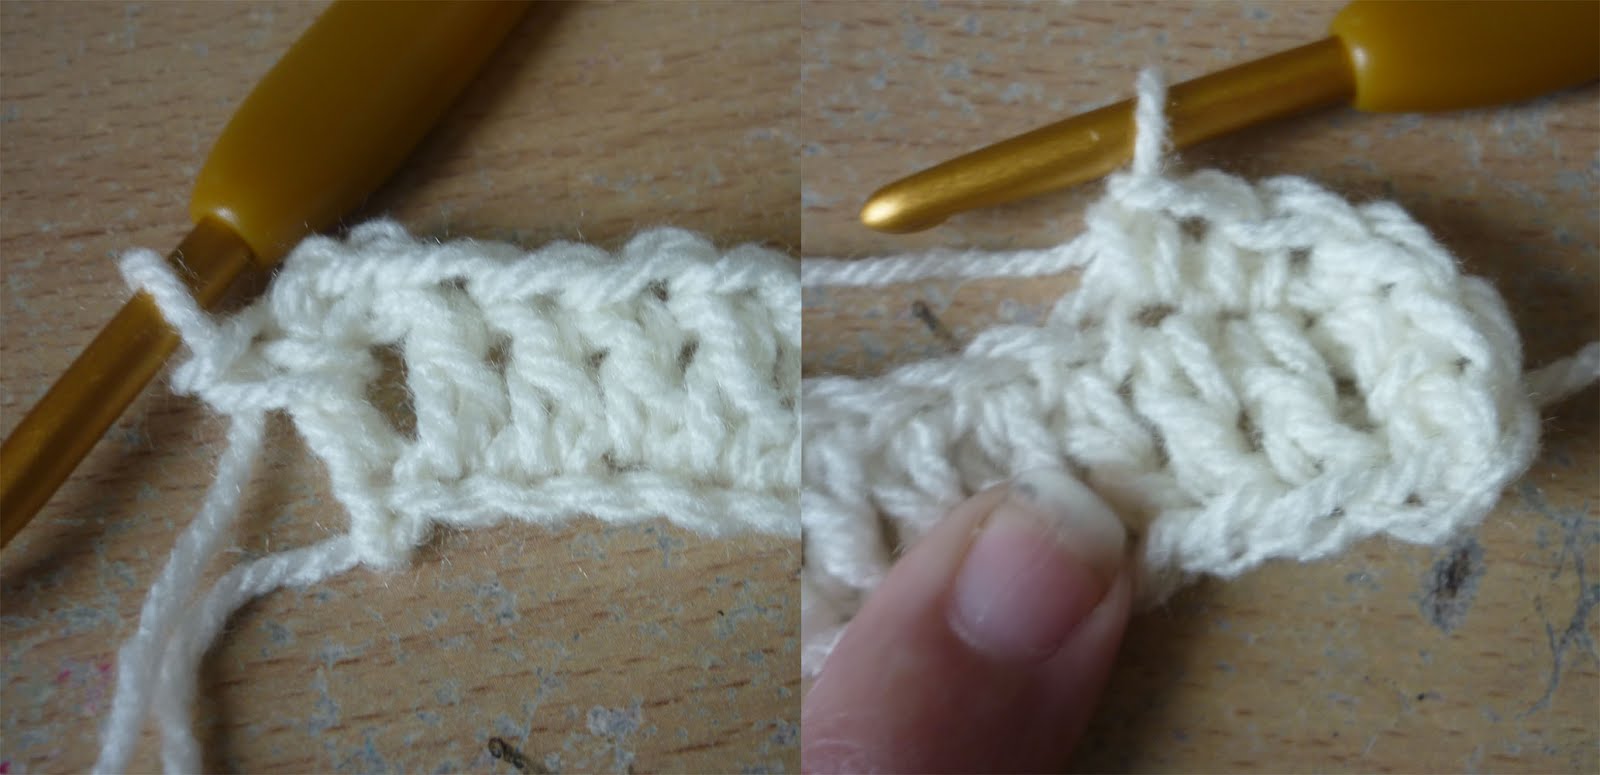
7: Ch3, dc in the first 15 stitches, *fpdc around the next stitch, bpdc around the next stitch*, repeat around, join to the top of the ch3.
8: Repeat round 7.
9-16: Ch3, dc in each stitch around, join to the top of the ch3. - 55dc, 23.5cm from row 1-16. 15.5cm from row 6-16. 24cm across at the widest point.
17: Ch3, dc in the next 10 stitches, skip the next skip the next 29 stitches, dc in the last 15 stitches, join to the top of the ch3. First leg started. - 26dc
18: Ch3, dc in each stitch around, join to the top of the ch3. - 26dc
19: Ch3, *fpdc around the next stitch, bpdc around the next stitch*, repeat around, join to the top of the ch3.
20: Ch1, *fpsc around the next stitch, bpsc around the next stitch*, repeat around, join to the ch1. End off, First leg complete. -26 stitches, 6cm from rounds 17-20, leg is 10cm wide.
21: With the front facing up, rejoin your yarn (with a long tail to sew closed gap) to the second unworked stitch (see photo below) and chain 3, dc in the next 25 stitches, join to the top of the ch3. - 26dc
22-24: Repeat rounds 18-20 to complete the second leg. Sew the gap closed.
To make the straps:
1: Mark off the centre 9 stitches at the back of the overalls (see photo below) and join your yarn to the first one (to the right) Ch3, dc into the next 8 stitches. - 9 dc (counting the starting chain)
2-5: Ch3, turn, dc in each stitch across. - 9dc
6: Ch3, turn, dc in the next 3 stitches. Leave the rest unworked. - 4dc
7-17: Ch3, turn, dc in each stitch across. - 4dc
End off at the end of row 17 and rejoin the yarn to the outermost unworked stitch of row 6.
Repeat rows 6-17 for the second strap.
End off, weave in all tails.
Where you place the buttons comes down to your own personal preference. The dc spaces are large enough to work as button holes. I prefer to place my buttons on the strap and have it sitting behind the bib, but you may like to sew your buttons onto the bib and have the strap on the front. Either way is fine.
To finish off your overalls and add some neatness to the edges, join your yarn to any stitch on the top of the bib, and ch1, sc around the entire bib, the side of the overalls, evenly around both straps, across the second side of the overalls and back to where you started on the bib.Weave in all tails and you're done!
Sunday, February 7, 2016
Delicate Princess Newborn Dress
Hello all, and welcome to the first pattern for 2016! I really had hoped to get this up at the start of January, but like usual, life had other ideas. None the less, it is finally finished and I'm so happy with how it came out.
The pattern itself isn't a hard one to follow, in fact I'm confident that people who are relatively new to crocheting should be able to follow along just fine. It gets a little fiddly, but it is so beautiful that it's worth the effort.
Now, I couldn't just stop at the dress, oh no. So I have in the works some matching pieces to go with it, which will be released over the next month or so, so keep an eye out for them too!
Size:
Full term newborn (6-9lb)
You Will Need:
Thread. I used Sullivans International Natural Soft Crochet and Knitting Thread. It says on the packet 4ply equivalent, so you could also use a 4ply yarn. You will need 2 balls.
3mm Hook
Tulle
3 Buttons
Ribbon (about a meter)
Special Stitches:
Special Stitches:
trc = Triple Crochet Learn how to do it here.
Picot = Learn how to make a picot here.
Chains counts as a stitch, the last stitch of each row should be made into the top of the ch's from the previous row.
1. Chain 60, dc in the 3rd chain from hook, *2dc in the next chain, dc in the next chain*, repeat across – 87
2. Ch3, turn, dc in each stitch across – 87
3. Ch3, turn, *dc in the next 3 stitches, 2dc in the next stitch*, repeat across – 106
4. Ch3, turn, dc in each stitch across – 106
5. Repeat round 4
6. Ch3, turn, dc in the first 13 atitches, skip 28 stitches, ch2, dc in the next 23 stitches, ch2, skip 28 stitches, dc in the last 14 stitches – 55 including chains
7. Ch3, turn, dc in the same stitch, 2dc in each stitch and chain across – 110
8-9. ch3, turn, dc in each stitch across.
10. ch4 (counts as dc and ch1), *dc in the next 2 stitches, ch1* repeat across, skip the last stitch and dc in the ch3.
11-14. ch5 (counts as dc and ch2), turn, *dc in the next 2 dc’s, ch2*, repeat across, dc in the last stitch.
15-22. ch6 (counts as dc and ch3), turn, dc in the next 2 dc’s, ch3*, repeat across, dc in the last stitch.
23-25. ch7 (counts as dc and ch4), turn, *dc in the next 2 dc’s, ch4*, repeat across, dc in the last stitch.
26. ch8 (counts as trc and ch4), *trc in the next 2 dc's, ch4*, repeat across, trc in the last stitch.
27. ch1, turn, *in the next ch4 gap (sc 3 times, picot, sc 3 times), sc in the next 2 trc's* repeat across. sc in the last stitch.
Do not end off. Sc evenly up the side of the back opening. End off. Attach yarn to the bottom of the other side of the back opening and sc up that evenly too.
Sleeves.
1. Join yarn to any stitch (I aim for a spot under the arm to hide the join) and sc evenly around the entire arm hole 38 times, join.
2-4. ch2, hdc in each stitch around, join.
5. ch1, sc in the first 5 stitches, sc2tg, sc in the next 8 stitches, sc2tg, sc in the next 5 stitches, sc2tg, sc in the next 8 stitches, sc2tg, sc in the last 4 stitches, join. - 34
6. ch1, sc in each stitch around, join.
7. ch1, *sc in the next 4 stitches, sc2tg*, repeat around, join.
8. ch1, sc in each stitch around, join.
End off, weave in tails. Repeat rounds 1-8 for the second sleeve
Making the underskirt,
Chain 115, hdc in the second chain from hook and each across. End off leaving a very long tail, to sew the underskirt to the dress.
Cut your tulle. I purchase mine in rolls that are 15cm wide. I cut my lengths to 50cm, and then trimmed once attached. I needed 36 strips of tulle for the skirt. This created a very full skirt. You could use less if you wanted less floof.
I attached the tulle to every 3rd stitch. To do this, fold the tulle strip in half, pull the loop through a stitch, pass the ends of the strip through the loop and pull it tight.
Work slow doing this, if you pull too hard you will pull the stitches out of shape, This past is a bit fiddly.
Lay your dress flat, wrong side up. You will want to attach the underskirt to the bottom of row 9. When you are sewing the skirt to the dress, be sure to pick up the back stitches, instead of going right through your piece, you don't want the stitches showing on the right side. One side will be about an inch short, this is the side that will go over the buttons. Weave in all tails securely.
Attach your 3 buttons to the back of the dress.
For the bow, cut 2 lengths of ribbon. One will be threaded in and out of every group of 2 stitches on row 9. This piece ties at the rear. To make the bow at the front take the second piece of ribbon and tie it in a knot around the first piece of thread in the middle of the front of the gown. Tie a bow tightly, Cut the tails to the desired length.
That's it, your gown is done! I hope you have as much fun making this as I did. Don't forget to share your photos on the Ravelry Page.
Wednesday, March 4, 2015
Snuggle Cuddle Cocoon Resized - Free Newborn Crochet Pattern
Good afternoon all.
Ever since the release of the Snuggle cuddle cocoon back in 2012 people have asked for a newborn size. I am pleased to say that I now have instructions on how to make it to fit newborns, and 0-3 months. Jackson is 2 months old in the images (11 pound, 59cm long), so you can see how it fits. If you have a long bubba just add some more rows. This cocoon used the best part of a 140g ball of Red Heart super saver, which is 260yards/238meters so make sure you have enough yarn.
I imagine this would also look super fun with stripes, or large blocks of colour. Have a play with it, I'm sure you guys will find some wonderful colour combo's, you always do :)
As you can see, I also have some lovely worsted weight yarns now, so I can go ahead and make some wonderful patterns with them. Very exciting stuff indeed!
:::::EDIT:::::
The flap on the cocoon in the image is backwards. Somehow my baby brain managed to turn the thing in the wrong way. Your cocoon will have a flap facing the opposite direction, unless you actually want it to face this way and in that case just turn the piece inside out :) I'll get new photos when I have a chance to remake the cocoon.
You will need:
Worsted Weight/10ply yarn I used Red Heart Super Saver in aran fleck for the main colour and Bernat super value in brown for contrasting.
6.5mm hook for 0-3 months
6.00mm hook for an average newborn
5.5mm hook for a small newborn
4 buttons
Joins are made to the first stitch, not the chains.
1. Ch3, dc 10 times in the 3rd chain from hook, join. (10)
2. Ch3, 2dc in each stitch around, join. (20)
3. Ch3, *1dc in the first stitch, 2dc in the next stitch* Repeat around, join. (30)
4. Ch3, dc in each stitch around, join. (30)
5. Ch3, *1dc in the first stitch, 2dc in the next stitch* Repeat around, join. (45)
6. Ch3, *1dc in the first 2 stitch, 2dc in the next stitch* Repeat around, join. (60)
7. Ch3, dc in each stitch around, join. (60)
8. Ch3, dc in each stitch around, do not join. From here on we will be working in rows.
9. Ch10, turn, dc in the 3rd chain from hook and in each remaining chain, then in each dc across (68)
10- 26. Ch3, turn, dc in each dc across. End main colour.
Change to contrasting colour and sc across, then sc evenly down the opening and back up the other side.
Sew on buttons and weave in all tails.
Saturday, November 1, 2014
Edith Bonnet - Free Crochet Pattern
Good morning lovlies! This weeks pattern is for a fancy little bonnet. It may look a little complicated but it is a super easy pattern and Im sure even beginners will be able to attempt this beauty. It comes in 2 sizes, prem 24-26 weeks gestation, and Newborn (full term) I have only tried this with a variety of pinks and whites so far but I bet it will look amazing in all sorts of fantastic colour combinations.
For 24-26 weeks you will need:
DK weight/8ply/Light worsted yarn in a main colour and contrasting colour (you can also use 4ply/fingering for contrast if you want it thinner, just stitch loosely)
4mm hook
1: ch3, dc in the first ch 9 times, join
2: ch3, 2dc in each stitch around, join
3: ch3, *2dc in the first stitch, dc in the next stitch*, repeat around, join.
4: ch3, *2dc in the first stitch, dc in the next 2 stitches*, repeat around, do not join.
5: ch2, turn, hdc in the front loops only of each stitch around.
6-8: ch3, turn, dc in each stitch around.
9: ch2, turn, hdc in the front loops only of each stitch around
10: ch2, turn, hdc in each stitch around, do not turn
11: sc evenly around the neck line of the bonnet. End off yarn.
Hold bonnet so the front is facing you, and the rear is pointing away. Join yarn to an unworked loop on the left side of round 5 with a sl st. sc into the same stitch. *hdc 3 times in the next loop, sl st into the next loop* repeat across, sc into the last back loop. End off.
Join your yarn in the same manner to the unworked loop from round 9 and sc in the same stitch, *dc 3 times in the next loop, sl st into the next loop* repeat around, sc in the last loop. End off.
With your contrasting colour, join the yarn to the first sc on the front ruffles. *Sc into each of the 3 dc's, sc over the top of the sl st (there will be a gap below each sl st from the previous row, use that to complete the sc)* repeat across, sc in the last sc. End off.
With contrasting colour, chain 40, join yarn to a corner of round 10 and sc in each stitch across until you get to the second last stitch, ch1, sl st into the last stitch, chain 40 and end off.
Weave in all ends.
For Newborn Size:
DK weight/8ply/Light worsted yarn in a main colour and contrasting colour (you can also use 4ply/fingering for contrast if you want it thinner, just stitch loosely)
5mm hook
1: ch3, dc in the first ch 12 times, join
2: ch3, 2dc in each stitch around, join
3: ch3, *2dc in the first stitch, dc in the next stitch*, repeat around, join.
4: ch3, *2dc in the first stitch, dc in the next 2 stitches*, repeat around, do not join.
5: ch2, turn, hdc in the front loops only of each stitch around.
6-9: ch3, turn, dc in each stitch around.
10: ch2, turn, hdc in the back loops only of each stitch around
11: ch2, turn, dc in each stitch around, do not turn
12: sc evenly around the neck line of the bonnet. End off yarn.
Hold bonnet so the front is facing you, and the rear is pointing away. Join yarn to an unworked loop on the left side of round 5 with a sl st. sc into the same stitch. *hdc 3 times in the next loop, sl st into the next loop* repeat across, sc into the last back loop. End off.
oin your yarn in the same manner to the unworked loop from round 9 and sc in the same stitch, *dc 4 times in the next loop, sl st into the next loop* repeat around, sc in the last loop. End off.
With your contrasting colour, join the yarn to the first sc on the front ruffles. *Sc into each of the 3 dc's, sc over the top of the sl st (there will be a gap below each sl st from the previous row, use that to complete the sc)* repeat across, sc in the last sc. End off.
With contrasting colour, chain 45, join yarn to a corner of round 10 and sc in each stitch across until you get to the second last stitch, ch1, sl st into the last stitch, chain 40 and end off.
Friday, November 22, 2013
Christmas Stocking Cocoon - Free Pattern
It has been so very busy here these last few weeks! Ive been working on this beauty on and off but finally got it finished today in time to share for the holiday season!
This stocking has duel purposes. It is designed first as a photography prop, and so that is what it is sized to. You can also use it as a decoration, or as a regular giant sized stocking.
It will fit a newborn baby inside, up to maybe 10lb. If you have a bigger bub, jump the hooksize up from a 9 to a 10.
Instructions are for a solid stocking but you can very easily make one with stripes, in blocks of colour, with heel and toe in a contrasting. Multiple possibilities!
You will probably find I only have 2-3 more patterns to share this year, as I am gearing up ready for 2014. This year I aimed for a pattern a week and I came mighty close. Next year Id like that to be a reality. There is still a huge lacking of prem and angel sized items out there, it is my mission to fix that! If you have ideas, suggestions or anything that you want to see as far as keepsakes and prem related patterns, by all means please let me know!
You will need:
1 ball of your main colour in DK weight yarn (8ply)
1 ball of yarn in a contrasting colour yarn (dk or.), chenille works great for this
9mm hook
sewing needle.
The entire piece is worked double stranded to make it super thick and chunky.
1. Into a magic ring, ch2, dc 8 times, join. Pull tight (or if you prefer, ch2, dc 8 times into the first chain)
2. ch3, dc twice in the same stitch and twice in each remaining stitch around. join. (16)
3. ch3, dc twice in the same stitch, dc in the next stitch, *2dc in the next stitch, dc in the next stitch* repeat around, join. (24)
4. ch3, dc in the same stitch, dc in each stitch around, join (24)
5. ch3, dc twice in the same stitch, dc in the next 2 stitches, *2dc in the next stitch, dc in the next 2 stitches* Repeat around, join. (32)
6-10. ch3, dc in the same stitch, dc in each stitch around
If changing colours for the heel this is where you would end off main and attach contrasting yarns. The next few rows are straight rows requiring turning.
11. ch3, dc in the same stitch and the next 17 stitches (18)
12-14. ch3, turn, do in each stitch across
Now we're going to go back to working in rounds
End off your yarn leaving a long tail. Sew up the heel of your work. (see image)
15. rejoin your yarn (if using a contrasting heel, switch back to your main colour) in or close to the seam and chain 3. dc evenly around the entire opening, join, you should have 28 (or close to it) stitches. If not, go back and add a enough extra ones to bring you to 28.
16. ch3, dc, 2dc in the next stitch, dc in the next 5 stitches, 2dc in the next stitch, dc in the next 5 stitches, dc2 in the next stitch, dc in the next 5, dc2 in the next stitch, dc in the next 5, dc2 in the next, dc in the last 2, join.
Now we work on gaining some height with simple dc rounds.
12-17. ch3, dc in each stitch around, join.
End off your main colour and join chenille yarn for the cuff (or contrasting normal yarn)
18-20. ch3, dc in each stitch around, join.
There you have one, one huge sized stocking as a cocoon, or a decoration, or to use as a unique giftwrap perhaps!
Friday, October 18, 2013
Mohair Bricks Beanie
Good morning everyone! Today I have a super cute and fun mohair hat pattern for you all! Made with Moda Vera Fern, which is a 4ply fingering weight mohair blend. Any similar weight yarn or mohair should work fine. This hat is sized at 0-3 months, drop a hook size to 4.5mm for very new babies or add another increase round and a few more brick repeats for a larger size.
Moda Vera Fern, or another similar 4ply mohair yarn
5mm hook
R1: ch2, dc 12 times in 1st chain, join.
R2: ch2, 2dc in each stitch around - 24
R3: ch2, *2dc in the first stitch, dc in the next stitch* Repeat around, join - 36
R4: ch2, *2dc in the first stitch, dc in the next 2 stitches* Repeat around, join - 48
R5: ch2, *2dc in the first stitch, dc in the next 3 stitches* Repeat around, join - 60
R6: ch4(sc+ch3), sk 3 stitches and sc in the 4th, *ch3, sk 3, sc* repeat around, slst to the first chain of the starting ch4
R7: sl st into the first ch3 space ch3 (counts as first dc), dc twice more in the same ch3 space, 3dc in each ch3 space around, join
R8: ch1, sc in the same stitch, sk the first set of dc stitches and sc in the space between them and the next 3, *ch3, sk 3, sc in the space between the 3dc clusters* repeat around, slst to the first chain of the starting ch3
R9: sl st into the first ch3 space ch3 (counts as first dc), dc twice more in the same ch3 space, 3dc in each ch3 space around, join
R10: ch1, sc in the same stitch, sk the first set of dc stitches and sc in the space between them and the next 3, *ch3, sk 3, sc in the space between the 3dc clusters* repeat around, slst to the first chain of the starting ch3
R11: sl st into the first ch3 space ch3 (counts as first dc), dc twice more in the same ch3 space, 3dc in each ch3 space around, join
R12: ch1, sc in the same stitch, sk the first set of dc stitches and sc in the space between them and the next 3, *ch3, sk 3, sc in the space between the 3dc clusters* repeat around, slst to the first chain of the starting ch3
R13: sl st into the first ch2 space ch3 (counts as first hdc), hdc twice more in the same ch3 space, 3hdc in each ch3 space around, join
R14: ch1, sc in each stitch around, join. End off and weave in all ends.
Friday, October 4, 2013
Super Versatile Romper
Hello wonderful people!
I hope everyone is doing well. Ive been on holiday on the east coast of Tasmania, my gosh, it was very beautiful and inspiring. I am however, glad to be home and back to my crochet.
I have a super fun pattern for you all today, one that Ive had in my mind for some time now and never really got to working on until this week. Introducing, the super versatile romper! Be it a boy or a girl, this romper works for both. As an article of clothing, a summer cover-up or even as a photography prop.
I have a bunch of fun variations posted which will come in over the next few weeks, but for now, here is the basic pattern.
The sizing is based off a baby in 000 (in Aus sizes, which is equivalent to a 0-3 month)
You could easily adjust this by upping the hook and yarn sizes, just remember that larger babies have longer torsos so you will need to add some extra rounds after R17 to compensate for this.
Worsted weight yarn is not readily available in Australia (Anyone want to post some down? hehe) so I can't test with this, but I would hazard a guess that worsted and a 6mm with some extra rows *should* get you around the 3-6month mark.
Ch2 at the start of the rounds/rows does NOT count in the stitch count.
You will need:
dk weight yarn in a main and contrasting colour
5mm hook
4 buttons
R1: ch20
R2: dc in the 3rd chain from hook and each across (18)
R3: ch2, turn, dc across (18)
R4: ch2, turn, 2dc in the first stitch, dc in the next 16 stitches, 2dc in the last stitch (20)
R5: ch2, turn, dc in each stitch across (20)
R6: ch2, turn, 2dc in the first stitch, dc in the next 18 stitches, 2dc in the last stitch (22)
R7: ch2, turn, 2dc in the first stitch, dc in the next 20 stitches, 2dc in the last stitch (24)
R8: ch2, turn, dc in each stitch across (24)
R9: chain 24,, turn, skip all 24 stitches and join to the very last stitch. From here we will work in a round.
R10: ch2, dc in each stitch and chain around, join (48)
R11-17: ch2, dc in each stitch around, join
R18: ch2, dc in the next 24 stitches (24)
R19: ch2, turn, dc2tg, dc in the next 20 stitches, dc2tg (22)
R20: ch2, turn, dc in the first stitch, dc2tg twice, dc in the next 12 stitches, dc2tg twice, dc in the last stitch (18)
R21: ch2, dc, dc2tg three times, dc in the next 4 stitches, dc2tg three times, dc in the last stitch(12)
R22: ch2, turn, dc in the first stitch, dc2tg, dc in the next 6 stitches, dc2tg, dc in the last stitch (10)
R23: ch2, turn, dc, dc2tg, dc, dc2tg, dc, dc2tg, dc (7)
R24: ch1, turn, sc across. End off, weave in ends.
R25: With the back of the piece facing you, Join yarn to the first unworked st from round 17, ch2, dc in the same st and the next 23 stitches (24)
R26: ch2, turn, dc2tg, dc in the next 20 stitches, dc2tg (22)
R27: ch2, turn, dc, dc2tg, dc in the next 16 stitches, dc2tg , dc (20)
R28: ch2, turn, dc, dc2tg twice, dc 10, dc2tg twice, dc (16)
R29: ch2, dc, dc2tg three times, dc twice, dc2tg three times, dc (10)
R30: ch2, turn, dc, dc2tg four times, dc (6)
R31-32: ch2, turn, dc across (6)
ch2, turn, 2dc in the first st, dc in the next 4 stitches, 2dc in the last st (8) End off.
With a contrasting colour sc evenly around all edges (both the bottom opening and the top)
Weave in all ends.
Straps
R1: ch25, dc in 3rd ch from hook and each across (23)
R2: ch1, sc in the end (side) of the last dc stitch, then on the opposite side of the chains to the dc you just made, sc in each across (see pic below), at the end do another sc in the side of the dc and then sc back across the dc’s from R1. Join with a sl st, end off and weave in tails.
Sew straps to the back of the bodysuit.
Add buttons, 2 for the bottom and 2 for the straps.
Monday, August 12, 2013
Chunky Christmas Bonnets
*waves* Hi guys!
I don't know about you, but I tend to find that I have all these plans for things to make for Christmas, and then BAM! before you know it December is here and you haven't finished even a half of what you planned.
In order to combat this, Im starting early! Today I have for you all a chunky and super fast Christmas bonnet, that comes in both 0-3 and 3-6 months. Of course, you could use any colours and turn it into something non Christmasy, but thats what I went with. Instructions below are for a solid coloured bonnet, and one that has a stripe. There are also 2 tie methods, go with whatever one suits you best. Ive also made this with pom pom yarn for the ties, and strands of thick n thin. They all look wonderful!
Christmas Bonnets
You will need:
DK weight yarn, bonnets
are worked holding 2 strands together, so 2 balls of each colour
needed or wind off half a ball so you have 2.
10mm hook
140 inches (3.8yards,
3.6meters)of ribbon
Solid Bonnet with
Ribbon Ties
Leave a 12 inch end at
the start so you can sew in the back of the bonnet.
1: ch22 (0-3) or 24
(3-6), in the second chain from hook (sc, dc) *skip one ch, (sc, dc)
in the next, repeat across, turn
2-9: ch1, *sk 1 stitch,
(sc, dc) in the next stitch*, Repeat from * across Do not end off
For 3-6 months only:
Repeat above row one more time.
Using the tail you left
from the start of the chains, sew up the back of the bonnet. Weave in
ends.
10: ch1, sc evenly
along the bottom edge of the bonnet right around until you reach the
opposite corner. Do not sc along the front of the bonnet. Finish off
and weave in ends.
Cut 4 strands of ribbon
20 inches long. Using 2 for each corner, loop them in half and insert
the loop into the corner, pull the loose ends of the ribbon through
the loop to create a knot and pull tight. Using the remaining ribbon
weave it in and out of the last row of the bonnet (I so in between
the groups of sc/dc) Once the ribbon is even tie carefully at the
corners to prevent it moving, then trim the ends of the ribbon ties
to make sure they are all the same length.
Striped Bonnet with
Braided Ties
Leave a 12 inch end at
the start so you can sew in the back of the bonnet.
0-3 Months
Starting with main
colour
1: ch22 , in the second
chain from hook (sc, dc) *skip one ch, (sc, dc) in the next, repeat
across, turn
2-5: ch1, *sk 1 stitch,
(sc, dc) in the next stitch*, Repeat from * across, turn
6-7: Switching to
contrasting colour: ch1, *sk 1 stitch, (sc, dc) in the next stitch*,
Repeat from * across, turn
8-9 Switching back to
main colour: ch1, *sk 1 stitch, (sc, dc) in the next stitch*, Repeat
from * across, do not end off (follow All Sizes below.
3-6 Months
Starting with main
colour
1: ch24 , in the second
chain from hook (sc, dc) *skip one ch, (sc, dc) in the next, repeat
across, turn
2-6: ch1, *sk 1 stitch,
(sc, dc) in the next stitch*, Repeat from * across, turn
7-8: Switching to
contrasting colour: ch1, *sk 1 stitch, (sc, dc) in the next stitch*,
Repeat from * across, turn
9-10: Switching back to
main colour: ch1, *sk 1 stitch, (sc, dc) in the next stitch*, Repeat
from * across, do not end off (follow All Sizes below.
ALL SIZES
Using the tail you left
from the start of the chains, sew up the back of the bonnet. Weave in
ends.
10: ch1, sc evenly
along the bottom edge of the bonnet right around until you reach the
opposite corner. Do not sc along the front of the bonnet. Finish off
and weave in ends.
Cut 3 strands each of
main and contrasting colours per corner, fold in half, pull the loop
through the corner of the bonnet, and then pull the loose ends back
through the loop, pulling tight to create a knot. Braid strands.
Repeat for other corner.
Tuesday, May 7, 2013
Lil Pants - Free Pattern
Hello lovelies! Hope everyone is having a fantastic day today.
Today I have a pattern for a pair of lil pants, male or female. I was originally planning on releasing these a a paid for pattern, but honestly, I have more fun sharing. Perhaps if you like my designs you could click on an advert for me so I can earn a few cents? It would be much appreciated. It would also be great to see more people adding images to Ravelry (or sharing them on my FB page) I like to oogle at the yarns you all use!
Pants are easily adjustable, you just need to know the measurements for the Waist, legs and from bellybutton to crotch.
NOTE::: There will be a small gap in the crotch where the legs split, so just sew that closed when you are done.
Lil Pants 0-3 Months
Special
stitches used: Foundation double crochet. For instructions on this
stitch please visit
http://www.youtube.com/watch?v=YGPkRHF0rUw
Front
Post Double Crochet – FPDC
Back
Post Double Crochet - BPDC
Supplies:
DK weight yarn (8ply
for AUS/UK) in main and contrasting colours.
5.5mm hook
3.5mm hook for tie
US terms used
throughout.
With contrasting
colour.
1: Using the foundation
double crochet method, make 42 dc's, join. This gives the waist a
more flexible band then chaining will.
If you are unfamiliar
with this technique or choose not to do it, you can chain 44, dc into
the second chain from hook and each across, join. Use the tail to
close the bottom of the dc join.
2: ch3, * fpdc
around the first dc, bpdc around the next dc *, repeat around, join.
3:
Repeat round 2.
4:
ch1, sc in each stitch around, join. End off contrasting colour.
5:
Join main colour.
Ch3, dc in each stitch around, join.
6-10:
ch3, dc in each stitch around, join.
11:
ch3, dc in the next 21 stitches, skip all the rest and join to the
top of ch3. One leg hole started.
12-16:
ch3, dc in each stitch around, join. At the end of round 16 end off
main colour.
17:
Join contrasting colour. Ch1, sc in each stitch around, join.
18:
ch3, * fpdc around the first stitch, bpdc around the next stitch *
repeat around, join.
19:
ch1, sc in each stitch around, join. End off contrasting colour.
Weave in all ends.
For
Second leg.
Join
main colour to an un-worked stitch near the centre back of round 10.
Repeat instructions from round 11 onwards to create second leg.
To
make the tie, using the main colour and a 3.5mm hook chain for 26
inches. Thread the chain under the fpdc's from round 2.
The legs should be around 5.5 - 6 inches long, if you crochet tight then add a few extra rounds for them.
Thursday, March 14, 2013
Party Legwarmers and Headband Set - Free Prop Pattern
It sure has been a long time coming! Finally I have a new photography prop pattern! This pattern will make a pair of super adorable ankle to knee leg warmers and a little flower headband. These beauties add a pop of colour, a little texture and a bunch of cute for any baby's shoot! Will fit a bub of 0-3 months old.
I have a whole bunch of prop ideas so you can expect plenty more of these in the future, along with more prem patterns, more toy patterns and more scrap kits!
5.5mm Hook
DK weight yarn in main and contrasting colours. (8ply for aus)
Chain does NOT count as a stitch.
Join in the FIRST stitch, not to the chain.
First stitch of each row is in the same space as the initial chain.
These steps will help create an almost invisible seam.
MAKE 2
Start with contrasting colour:
1. ch23, being careful not to twist it, join.
2. ch1, sc in each stitch around, join.
3-4 ch1, sc in the back loop only each stitch around, join.
End contrasting colour and join main
5. ch2, hdc back loop only in each stitch around, join.
6-11. ch2, hdc in each stitch around, join.
End main colour and join contrasting colour
12. ch1, sc in each stitch around, join.
13-14. ch1, sc in the back loops only in each stitch around.
End off and weave in all tails.
Chain 43 (or length needed for babies head)
sc in the second chain and each chain across. Sew together
Flower
ch2, sc 6 times into the 1sc chain.
In first sc work the following (sl st, hdc, dc, hdc, sl st) repeat in all six sc's to make 6 petals. Leave a long tail.
Sew flower onto headband.
Hope you enjoy this pattern :)
Wednesday, August 29, 2012
Super Chunky Cocoon Photo Prop - Free Crochet Pattern
Hey howdy hey peeps!
Today I have my very first photography prop crochet pattern for you all. It is a super chunky cocoon. Very easy to make, a little time consuming because of the size but it goes fast enough while your watching TV or some such.
You will need:
2 strands of yarn: I used DK weight yarn, green variegated and dark blue. The dark blue was a mystery yarn and seemed a little thicker then the other DK, but not quite thick enough for worsted, but you could probably use one dk and one worsted without any problems.
10mm hook
needle for sewing in ends
measuring tape.
Super Chunky Cocoon: Newborn
American terms used throughout.
R1. ch3, dc into 1st ch 9 times, join.
R2. ch3, dc in the same space *dc in the next, 2dc in the next stitch* Repeat around, join.
R3 - R4 Repeat R2
R5. ch3, dc in each stitch around, join.
Repeat R5 until piece measures 15 inches in total length.
Forming the top: (if you are using solid colours and want the top different, this is a good place to join another colour)
R1. ch1, sc around, join
R2 - R4 Repeat R1.
Fasten off and weave in ends. There you go, you have just made your very own thick and soft cocoon! Remember, when using this as a prop, baby should NEVER be left unattended!
Subscribe to:
Comments (Atom)


