Showing posts with label micro. Show all posts

Friday, June 1, 2018

Airlie Keepsake Diaper


Good morning all and hello to  June!

Today's pattern, the Airlie Diaper, aims to start bridging gaps in pattern sizes.

I feel that we need to make sure even the smallest of the small are represented and respected, and making sure size appropriate items are available, regardless of if they would be worn or kept as a keepsake, is a huge part of that. Sometimes people get confused at these tiny items, but from an angel mums perspective, trust me when I say they mean the world 💗

This diaper, is tiny. So very tiny. It is designed to fit a baby of 18 weeks gestation. For some, it will be wearable, and for others, it may just be a keepsake. So much depends on the baby so having the option there for parents should they need it, is what we're aiming for.

The pattern itself is a very fast one, and uses a tiny amount of yarn. I imagine if you were to use a full ball, you would get quite a lot of them from it! I've chosen to close with a small pin, but if you are looking for other options, velcro may be a good one. Normally I wouldn't suggest velcro for a preemie item, but there are not a lot of ways to hold something so small together, and still be practical. If you do decide to use velcro, make sure you cut it small. It won't need much to hold together. It might also be easier to glue the velcro on, instead of stitching the tiny pieces.
Very small hook and eye closure fixings might also work. Unfortunately I don't have any to test that right now.


Airlie Keepsake Diaper


Sized To Fit:
18 Weeks Gestation

You Will Need:
4ply baby yarn (fingering weight for non Aussies)
2mm hook
Pin or Velcro or Hook and Eye to close

1: Ch30, sc into the second chain from hook and each across. - 29

2: Ch2, turn, hdc in each stitch across. - 29

3: Ch1, turn, slst in the first 6 stitches, ch2, hdc in the next 17 stitches, leave the last 6 unworked. - 17

4: Ch2, turn, hdc2tg, hdc in the next 13 stitches, hdc2tg. - 15

5: Ch2, turn, hdc2tg, hdc in the next 11 stitches, hdc2tg. - 13

6-7: Ch2, turn, hdc in each stitch across. - 13

8: Ch2, turn, hdc2tg, hdc2tg, hdc in the next 5 stitches, hdc2tg, hdc2tg. - 9

9: Ch2, turn, hdc in each stitch across. - 9

10: Ch2, turn, hdc2tg, hdc in the next 5 stitches, hdc2tg. - 7

11-15: Ch2, turn, hdc in each stitch across. - 7

16: Ch2, turn, 2hdc in each stitch across. - 14

17: Ch2, turn, hdc in each stitch across. - 14

18: Ch2, turn, 2hdc in the first stitch, hdc in the next 12 stitches, 2hdc in the last stitch. - 16

19: Ch1, turn, sc in each stitch across, do not end, instead sc evenly around the entire diaper (being sure to add 2sc in corners to help with turns) and join to the ch1 from the start of this row. End off and weave in all tails.


Friday, September 15, 2017

15. Posy Beanie


Morning all and hello to day 15, our halfway mark! Today's beanie is very similar to the 18-19 weeker beanie from day 9. In fact, the Posy only has a couple of changes, to change the measurement size! It is, like the other, a great beanie for adding small embellishments and is the perfect place for someone who's only just learning to start.


Posy Beanie

You Will Need:
DK Weight/8ply Yarn
3.5mm Hook

Sized To Fit:
20 Weeks Gestation

1: Into a magic ring ch2, dc 12 times, join to the first dc. -12dc

2: Ch3, dc in the same stitch, 2dc in each stitch around, join to the first dc -24dc

3: Ch3, dc in each stitch around, join to the first dc.

4-7: Repeat round 3

End off, weaving in tails.

Alternative Options.

Add a round of crab stitch after round 7.
Use contrasting colours for every second round for stripes.
Use a contrasting colour for round 7. 


Saturday, September 9, 2017

9. Basic MicroPrem Beanie


Good morning lovelies and welcome day 9!

Today I thought we'd go back to basics, and do something quick and easy. These little basic dc beanies are the easiest beanie you'll ever make. They have just one increase round, and only 6 rounds total, making them a great place for beginners to start.

Once you've mastered the basic beanie, you can shake it up so many ways! Alternate colours on each round. Alternate colours every second round. Use 3 colours and create an ombre! You could use a contrasting colour on the last round to make a more defined brim, or even put a picot edge on there!

These hats are also an excellent way to use up buttons! If you're anything like me, you have a stash of miss-matched buttons in the craft cupboard! I have a bunch, mostly vintage from my nanna, and I like to add a contrasting one to these small hats. Cute as a button! Oh yes, pun intended! Little bows, ribbons and flowers can also be used to decorate.

These are also a great hat to make on commutes, as they take up barely any space in your bag or even your pocket, and you can make oodles from a 50g ball of yarn.


Basic Micro Prem Beanie

You Will Need:
DK Weight/8ply Yarn
3.5mm Hook

Sized To Fit
18-19 Weeks Gestation

1: Into a magic ring dc 10 times, join to the first dc. -10dc
2: Ch3, dc in the same stitch, 2dc in each stitch around, join to the ch3. -20dc
3-6: Ch3, dc in each stitch around, join to the ch3. -20dc

End off, weaving in all tails. Attach button to the front side of the beanie.


Thursday, January 5, 2017

Tulip Cocoon


Good morning beautiful people.

Well, here it is, the first pattern for 2017! I'm hoping for big things this year here on the blog, so lets see if we can pull them off! This year will be a mixed bag, as far as the blog goes. Preemie items like usual, but I want to throw in some more variety. Newborn items, props, DIY's, more dolls clothing, more recipe reviews, more of everything, and why not! I love to share these kinds of things with you all, and Im sure this year, like the last, will be full of fantastic posts and projects!! Preemie pattern wise, I want to try an focus on the smaller sizes, that often gets overlooked.

Today's pattern was designed after reading a post at Project Robby asking for cocoon patterns. Now I know I have a couple, and they get used so very much, but there could always be more. This is the first, and I'll have a new one every month this year. Lots of sizes and styles for wee babies. I'm not sure if you guys remember, but 2 years ago I made a hat for the hat drive using the flower pattern, and I said then I wanted to rework it into a cocoon, and Im so glad I did, it worked so well! You could use matching flower colours, different shades like I have here, or 2 completely different colours. I'm sure all options would work well.


Sized To Fit:
16/17 Weeks Gestation

You Will Need:
4mm hook.
DK/8ply yarn in a main colour (white) and a small amount of green and pinks for the flowers.
2 buttons for closing. (you could also use ribbon, or lengths of chained yarn for ties)

Tulip Cocoon

Special Stitches: DC3TG CLUSTER: yarn over, insert hook, yarn over, pull through, yarn over, pull through two, yarn over, insert hook, yarn over, pull through, yarn over, pull through two, (3 loops left on hook), yarn over, insert hook, yarn over, pull through, yarn over, pull through two, (4 loops on hook), yarn over, pull through all loops.

1: Into a magic ring, ch2, dc 9 times, join to the first dc. - 9dc 3cm across

2: Ch3, 2dc in the same stitch, 2dc in each stitch around, join to the first dc. -18dc 5.5cm across

3: Ch3, dc in the same stitch, 2dc in the next stitch, *dc in the next stitch, 2dc in the next stitch*, repeat from * to * around, join to the first dc. -27dc 7.5cm

4: Ch3, dc in the same stitch, dc in the next stitch, 2dc in the next stitch, *dc in the next 2 stitchs, 2dc in the next stitch*, repeat from * to * around, join to the first dc. - 36dc 10cm across

5: Ch3, dc in the same stitch, dc in the next 2 stitchs, 2dc in the next stitch, *dc in the next 3 stitchs, 2dc in the next stitch*, repeat from * to * around, join to the first dc. - 45dc 12cm across

6. ch3, dc in the same stitch, dc in each stitch around, do not join. - 45dc

Change to green yarn

7: Ch3, turn, skip 2 stitches, *(dc, ch1, dc) in the next stitch, skip 2 stitches*, repeat across, dc in the last stitch.

Change to pink yarn

8: Ch5 (counts as first dc and ch2), turn, *DC3TG cluster in the next ch1 space, ch2*, repeat across, dc into the ch3 from the previous round.

Change to white yarn

9: Ch2, turn, hdc in each stitch and chain across, the last stitch will be in the 3rd chain from the previous row. - 45hdc

10: Ch3, turn, dc in each stitch across. - 45dc

11-14: Repeat rows 7 to 10

15: ch3, turn, dc in each stitch across.

16: Ch1, turn, sc in each stitch across, 2sc in the last stitch, then sc evenly down the side of the opening, until you reach the bottom, sc once in the space between both sides and then sc evenly back up the other side of the opening, joining to the first sc. End off and weave in all tails. Completed size 13.5cm across the top, 18cm in length.

Attach buttons. I used the spaces in the dc's for "buttonholes" you could always use the gaps in the green or pink also.


Wednesday, December 28, 2016

My Sweet Alice


Good morning lovelies.

I know, I know. It's been forever since I blogged. I fell off the grid for a while there. I promise though, there was a good reason for that, and Im hoping that today's pattern makes up for the lack of them in the last few months.

Around the start of November, after months and months and months of trying, my partner and I finally got the amazing news that we were expecting another wee baby. How exciting! How joyus!

With Christmas just around the corner we decided to tell nooone at all, and we would make little gifts up to announce on Christmas day. I wanted to pop ultrasound photos into clear baubles with some glitter and fake snow. How wonderful a gift would that be? What a surprise for the kids! We started dreaming of names, thinking up nursery themes, planning a future with more noise and love.

Mid November, things got scary. Lots of light bleeding. Things didn't feel.. right. Every time I spoke with the doctors they assured me it was ok. I even went to emergency once where I was assured again, levels looked fine. I was told there was no point in doing a scan, that was just a snapshot of the here and now and wouldn't provide any useful information. I had so many blood tests in a 4 week period and still was told everything would be ok.

On December 7th, I had my first visit with prenatal and was supposed to get all my paperwork in order, and officially be "on the books" When I told them about the bleeding, the midwife said she wouldn't finish my paperwork, that we needed to "Make sure there was still a pregnancy there first" before they would complete it. I mean, I understand why, but the way she said it, it was.. blunt. I had to go for bloods and had a scan booked for next week.

On December 8th, I landed myself in the ER with heavy bleeding, and we received the shattering news that our baby had no heartbeat. She'd stopped growing at just 9 weeks. The doctor wasn't even gentle about it, very matter of fact. After he told us, he was in the room for all of 2 minutes, told me to re-book with my GP and left. That it seems, was that.

Once again, for the second time in my life, I left the same damn hospital empty handed. Once again, my heart has broken. All my fighting for the last few years, and there is still nothing in place in my local hospital for early loss. It makes me so sad, and so angry.

How incredibly hard was it to tell people in the same breath that I was pregnant, but now I'm not anymore. What an impossible conversation, To date, only a handful of people know. It's hard to write it over and over. It's hard to start a conversation when you know you have nothing but sad news. It's hard to shove a smile on your face when you just want to cry. I feel bad for making people sad at Christmas. I guess that's why I waited until after Christmas to write this post. It's my way of letting the world know that my heart hurts.

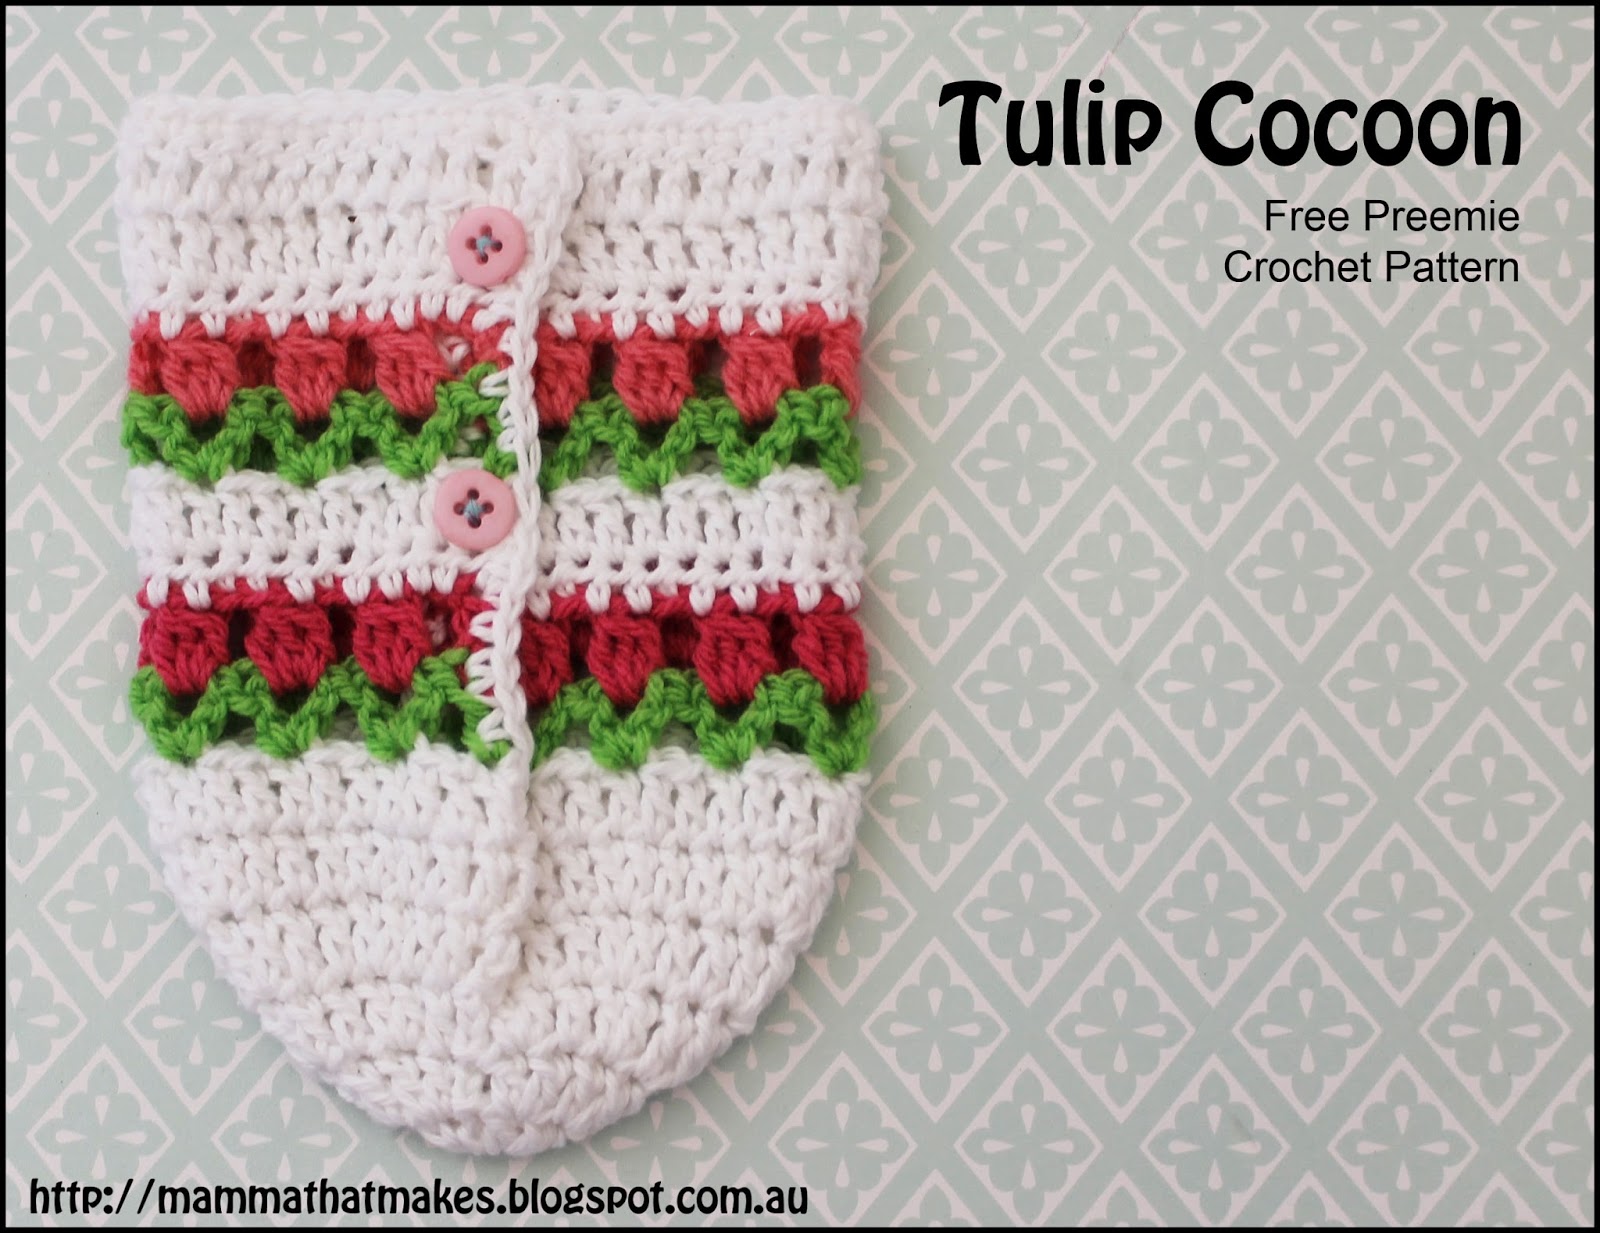
We decided to name our angel Alice. She may not be here physically, but she will forever be in our hearts.

This little cradle keepsake is made in her memory.


You Will Need:
4ply Cotton Yarn (I used tootgarook cotton by Bella Baby)
2.00mm hook
Small bow

Starting chains don't count in the stitch count.

1: ch15, 2hdc in the second chain from hook, hdc in the next 12 chains, 4hdc in the last chain, continue working around the corner and back down using the same chains you have already crocheted into (to create an oval), hdc in the next 12 chains, 2hdc in the last chain, join to the first hdc. -32hdc (6cm long, 1.5cm wide)

2: ch2, 2hdc in the first stitch, 2hdc in the next stitch, hdc in the next 12 stitches, 2hdc in each of the next 4 stitches, hdc in the next 12 stitches, 2hdc in each of the last 2 stitches, join to the first hdc. - 40hdc (7cm long, 2.5cm wide)

3: ch1, sc in the same stitch, 2sc in the next stitch, sc in the next stitch, 2sc in the next stitch, hdc in the next 12 stitches, *sc in the next stitch, 2sc in the next stitch*, repeat from * to * 3 more times, hdc in the next 12 stitches, *sc in the next stitch, 2sc in the next stitch*, repeat from * to * once more, join to the first sc. - 48 stitches (8cm long, 4cm wide)

4: ch1, sc in the same stitch, sc in the next stitch, 2sc in the next stitch, sc in the next 2 stitches, 2sc in the next stitch, dc in the next 12 stitches, *sc in the next 2 stitchs, 2sc in the next stitch*, repeat from * to * 3 more times, dc in the next 12 stitches, *sc in the next 2 stitchs, 2sc in the next stitch*, repeat from * to * once more, join to the first sc. - 56 stitches (8.7cm long, 5.5cm wide)

5: ch2, hdc in the back loop of the same stitch, hdc in the back loop of each stitch around, join to the first hdc - 56hdc

6-9: ch2, hdc in the same stitch, and in each stitch around, join to the first hdc. (3.2cm tall)

10: slst in the next 15 stitches, ch2, turn, hdc in the same stitch, hdc in the next 23 stitches. - 24

11: ch2, turn, hdc in the same stitch, hdc2tg, hdc in the next 8 stitches, hdc2tg, hdc in the next 8 stitches, hdc2tg, hdc in the last stitch. - 21hdc

12: ch2, turn, hdc in the same stitch, hdc2tg, hdc in the next 2 stitches, hdc2tg, hdc in the next stitch, hdc2tg, hdc in the next 5 stitches, hdc2tg, hdc in th next stitch, hdc2tg, hdc in the last stitch. - 16

13: ch2, turn, hdc in the same stitch, hdc2tg, hdc2tg, hdc in the next stitch, hdc2tg, hdc2tg, hdc in the next stitch, hdc2tg, hdc2tg, hdc in the last stitch. 10hdc

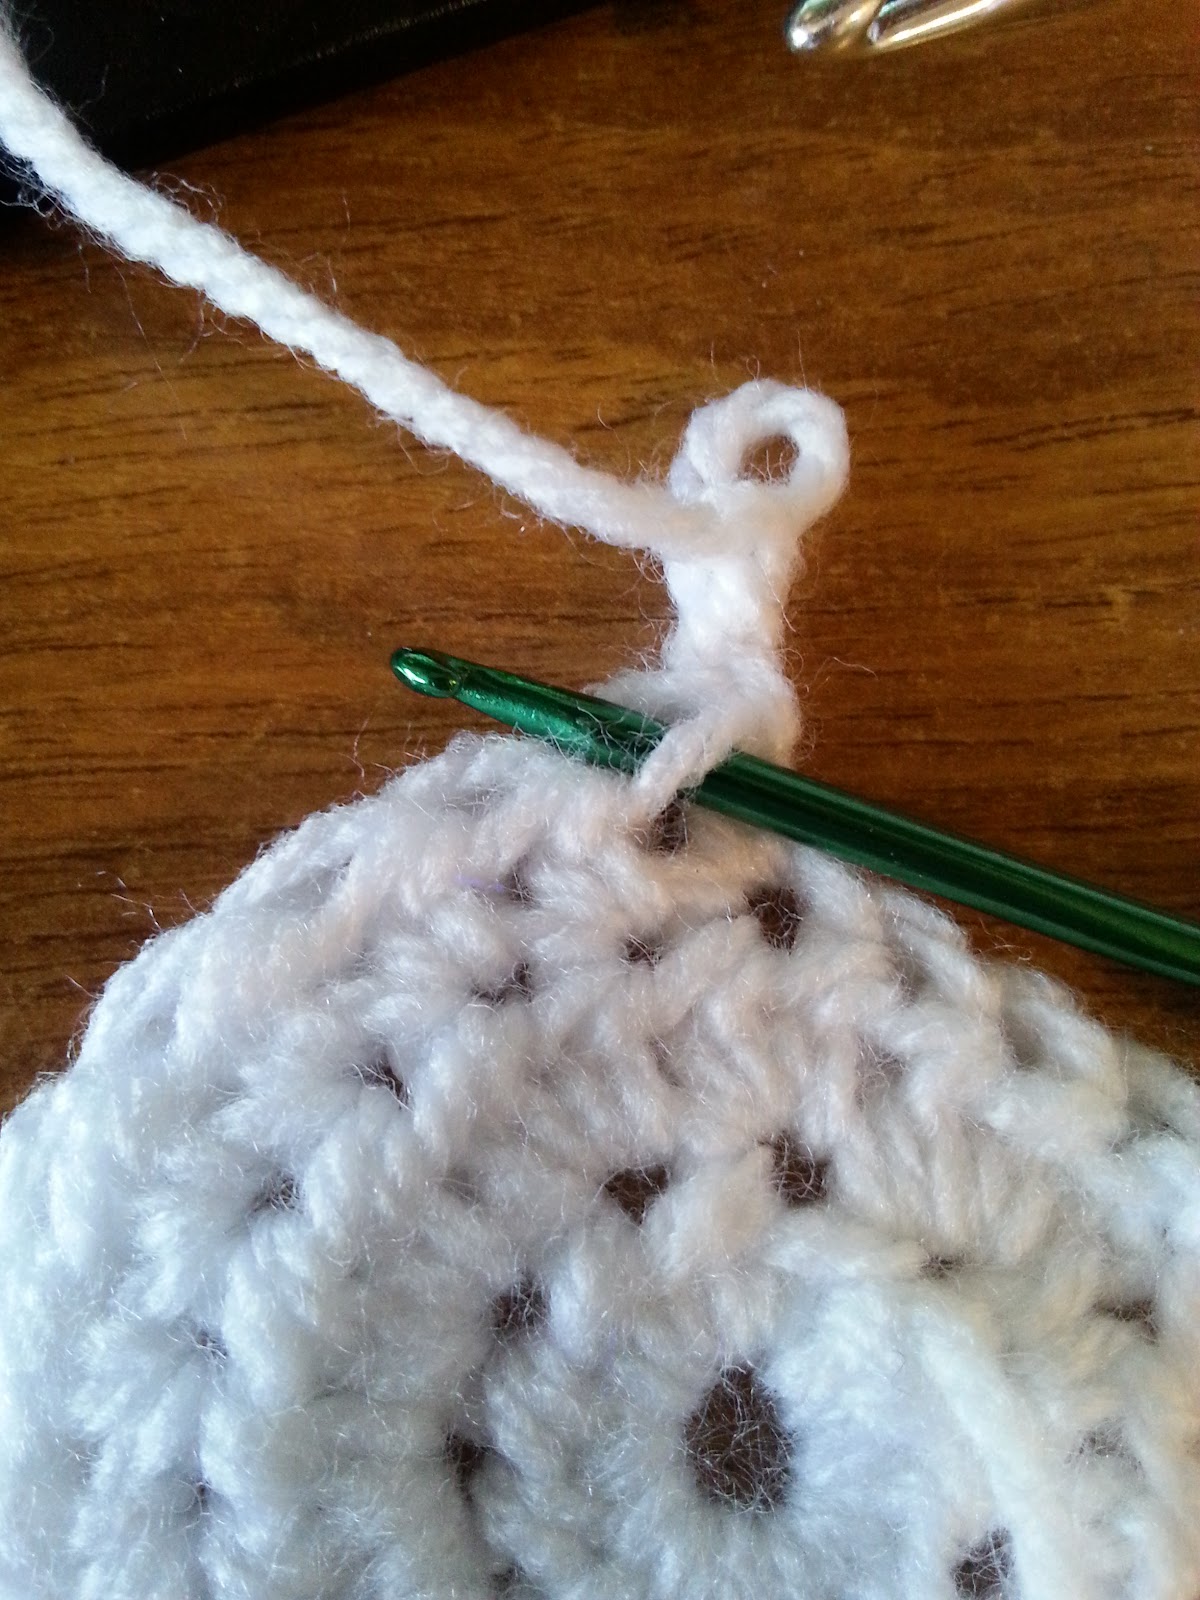
14: ch3, turn. Now this last row gets a little tricky, we're going to gather all the stitches together by doing one big dc10tg (yes, dc ten together) Here is how we do this...

yarn over, insert hook, yarn over, pull through , yarn over, pull through 2 loops, *yarn over, insert hook into the next stitch and yarn over, pull through, yarn over, pull through 2 loops* (3 loops on hook), repeat from * to * until you have used all the stitches and have 11 loops on your hook, yarn over once more and pull through all loops, ch1 to secure gather.

15: ch1, turn, sc evenly down the hood, (for me this was 8 sc), [[working in front loops only from here]] sc in the next stitch, hdc in the next stitch, dc into the next stitch *ch3, dc into the next stitch* repeat around until you have 2 stitches remaining before the hood starts, hdc in the next stitch, sc in the next stitch [[working around all loops now]] evenly sc up the side of the hood and join to the first sc. End off and weave in all tails.

Attach bow to the centre top of the hood.


Tuesday, September 20, 2016

20. The Margaret Bonnet


Good morning all and hello day 20! Only 10 more patterns left to go. Are you keeping up? Have a favourite so far?

Today's bonnet has a lot of subtle little textures, without going too extreme for such small delicate heads. I love using the 3rd loop stitch, and if it's one your not familiar with, pop onto google for a look. It's a lot of fun to use! 


Margaret Bonnet

Sized To Fit:
16 weeks gestation

You Will Need
8ply/DK weight yarn in a main and contrasting colour
4.5mm hook

All stitches are in American terms.

If you are new to crocheting, or new to bonnets, I recommend marking your first and last stitch of the rows with a stitch marker, so you can more easily see where they are.

1: Ch2, into a magic ring, hdc 11 times, join to the first stitch. - 11dc 2.5cm/0.9”

2: Ch2 (counts as first stitch), hdc in the same stitch, 2hdc in each stitch around, join to ch2. - 22 4.5cm/1.7”

3: Ch2, hdc in the next 20 stitches, do not join. - 21 6.5cm/2.5”

This next row uses the "3rd loop" to crochet in. Usually this is on the rear of the stitch, but because we turned our bonnet to work across the row, it'll be in front. Here is a photo to show you.
20160914_130338.jpg


4: Ch2, turn, hdc in the 3rd loop of each stitch across (the last one will be a bit hard to see). There will be 20hdc plus your ch2, do not hdc in the starting chain from the previous round. - 21

5: Ch2, turn, hdc in the same stitch as starting chain, hdc in each stitch across, do not crochet in the turning chain. - 21 (20 + ch2)

6: Repeat round 4

7: Ch1, turn, sc in the back loop of each stitch across. -21 (To help you attach ties later, place a stitch marker in the first stitch of this row)

Do not end, rotate your bonnet CLOCKWISE and sc evenly along the neckline of the bonnet, (around 20-23 stitches on average) join with a slst to the first sc of row 7.

End main colour.

For ties and brim:
With contrasting colour, chain 25 -

Holding your bonnet so that the rear of the bonnet is facing you and the neck opening is facing right-

Join yarn with a slst to the back loop of the first sc of row 7, sc in each stitch, back loop only, across, when you get to the end chain another 25 stitches to make the second tie. End off and weave in tails.

Finished Measurements: Total height 7cm/2.7" and 6.5cm/2.5" in width from crown to brim.


Saturday, September 17, 2016

17. The Jennifer Bonnet


Hello hello! Welcome to day 17. Our second little bonnet for the Itty Bitty Giant Hat Drive. Oh and it's a sweet one too. A little bit lacy and a whole heap delicate, the Jennifer bonnet is sure to be cherished.

How is everyone going with their hats so far? Don't forget that you can email me any photos of the pieces you've made for the hat drive, or from my patterns in general, and I'll add them to the fan albums on Facebook.

Jennifer Bonnet

Sized To Fit:
16 weeks gestation

You Will Need:
DK weight/8ply yarn
3mm hook

All stitches in American terms

1: Into a magic ring, ch3, dc 10 times, join to the first dc. - 10

2: Ch3 (counts as first stitch), dc in the same stitch, 2dc in each stitch around, join to ch3. - 20 (4.5cm/1.7”)

3: Ch3 (counts as first stitch), dc in the same stitch, dc in the next stitch, *2dc in the next stitch, dc in the next stitch*. Repeat around, join to ch3. - 30 (6cm/2.3”)

4: ch1, sc in the next stitch, *ch5, skip 1 stitch, sc in the next stitch*, repeat 12 more times - 14sc, 13 groups of 5chs

5: Ch3 (counts as dc), turn, sc in the center of the ch5 space, *ch1, sc in the center of the next ch5 space, repeat across, dc in the last sc. - 13sc, 2dc and 12chs

6: Ch1, turn, sc in the first 2 stitches, *1sc in the next ch1 space, 1sc in the next stitch*, repeat across, sc in the turning chain - 27sc

7: Ch1, turn, sc in the next stitch, *ch5, skip 1 stitch, sc in the next stitch*, repeat 12 more times - 14sc, 13 groups of 5chs

8: Ch3 (counts as dc), turn, sc in the center of the ch5 space, *ch1, sc in the center of the next ch5 space, repeat across, dc in the last sc. - 13sc, 2dc and 12chs

9: Ch1, turn, sc in the first 2 stitches, *1sc in the next ch1 space, 1sc in the next stitch*, repeat across, sc in the turning chain, chain 30, end off. - 27sc, 20ch

10. Join your yarn to the other corner and ch30 to make the second tie. End off. Weave in all tails.

Finished Measurements: Height from bottom to top of brim 7cm/2.7” and width from crown to front of bonnet 7cm/2.7”


Friday, September 16, 2016

16. The Robin Bonnet


Morning all and welcome to day 16. We're now onto the bonnet portion of the months patterns!
The first one I have for you today is both tiny and easy. So easy in fact, that I can now make these in about 15 minutes flat! Now that's what I call some fast hookin'! These itty bonnets are perfect for using up the last few meters of yarn and can be made in so many colours!

Robin Bonnet

Sized To Fit:
12 Weeks Gestation

You Will Need:
2.5mm hook
4ply/fingering weight yarn in a main and a contrasting colour.

All stitches are in American terms.

1: Into a magic ring, ch1, sc 10 times, join to the first sc. - 10

2: Ch3 (counts as first dc), dc in the same stitch, 2dc in each stitch around, join to the ch3. - 20

3: Ch3, dc in the next 19 stitches, do not join. - 19

4: Ch3, turn, dc in each stitch across. - 19

5: Ch3, turn, dc in each stitch across, do not end - 19

6: Ch1, sc along the bottom of the bonnet evenly, for me that was 13 sc, it may be more or less depending on the thickness of the yarn you use.


Finish off, weave in tails.

With your contrasting yarn chain 15, hold your bonnet so the neckline is facing right, and the front facing away from you, join your yarn with a sc the first sc from round 5, ch2, hdc in each stitch across the front of the bonnet, when you reach the last stitch ch2 and slst into the side of the first sc from round 5. Ch25, end off.


Finished Measurements: 5cm/1.9” in height and 5cm/1.9” in width from crown to brim.


Thursday, September 15, 2016

15. The Betty Beanie


Hello beautiful people!

Wow day 15 and we've officially hit the halfway mark! This also means this is the last beanie pattern. Tomorrow, we move on to bonnets! Excited? Oh I am! I LOVE bonnets!

Today's beanie is the Betty beanie, and it's a nice simple one with a pretty trim. It's very quick to make, and great for using up the last part of a ball of yarn.


The Betty Beanie 

Sized To Fit:
18 Weeks Gestation

You Will Need:
DK weight/8ply yarn in a main and a contrasting colour
3.75mm hook

All stitches are in American terms.

1: Into a magic ring, ch3, dc 10 times, join to the first dc. - 10dc

2: Ch3 (Counts as first stitch from here on), dc in the same stitch, 2dc in each stitch around, join. - 20 (5cm/1.9”)

3: Ch3, dc in the same stitch, dc in the next stitch, *2dc in the next stitch, dc in the next stitch*, repeat around, join to the ch3 - 30 (7cm/2.7”)

4-5: Ch3. dc in each stitch around, join to ch3. - 30

6: Ch3 (counts as first hdc and ch1), skip the next stitch, *hdc in the next stitch, ch1, skip 1 stitch*, repeat around, join to the second chain. - 15hdc, 15ch

7: Change to contrasting colour, ch1, *dc in the skipped stitch from the previous round (being sure to work behind the ch1, not in front of it), sc in the next stitch*, repeat around, join to the ch1. - 30

8: Ch1, sc in each stitch around, join to the ch1.

End off, weave in tails.

Finished Measurements: Total height 7.5cm/2.9” and 9.5cm/3.7” in width across the brim.

Wednesday, September 14, 2016

14. The Carrie Beanie


Good morning all, and hello day 14. Woah, 2 weeks in already, we're almost halfway there. This month sure is flying. How are you all going with your hats?

I want to just touch this morning on sizing. The blue hat is the one the measurements are based on for this pattern. I used a 2.5mm hook as stated, and King Cole Bamboo Cotton 4ply. The finished hat is sized for about 12 weeks gestation. The pink hat beside it uses Jaeger Siena Cotton, which is also a 4ply yarn, and a 2.5mm hook. It is 5.5cm in height and 7cm total width, and comes in closer to 14 weeks gestation. This is considerably larger than the first hat, yet both yarns are listed as 4ply/fingering weight. I know this can be a tad frustrating, but when it comes to hats this small, it's incredibly easy to go from one size to the next just by changing the yarn brand! This is something that doesn't effect larger hats quite so much, because there is a larger gap between one size to the next.

Luckily for us, charities and foundations across the globe can use all sizes! So unless you are making them for a specific bub, you'll be fine.


Carrie Beanie

Sized To Fit:
Approx 12-14 weeks gestation, depending on yarn thickness

You Will Need:
2.5mm hook
Fingering weight/4ply yarn

1: Into a magic ring, ch2, hdc 9 times, join to the first hdc - 9

2: Ch4 (counts as first sc and ch3), sc in the next stitch, ch3, *sc in the next stitch, ch3*, repeat around, join to the 1st chain - 9sc, 27chs (3.5cm/1.3”)

3: Slst into the first ch3 space, ch4 (counts as first sc and ch3), sc in the same space, (sc, ch3, sc) in each ch3 space around, join to the first chain. - 18sc (4.5cm/1.7” across widest points)

4-8: Repeat round 3

End off, weave in tails.

Finished Measurements: 5.5cm/2.1” total height, 6cm/2.3” total width


Friday, September 9, 2016

9. The Milly Beanie


*waves*

Hello all! Welcome to day 9.

Today's beanie is a super teeny one for sure. Not even 2 inches big, this precious little hat is really more of a keepsake than a wearable, but it is still super important. All losses hurt, and all families deserve a little something to know we care. Early pregnancy loss is still so taboo, and sadly very common. So many people try to brush it off, especially under 12 weeks, and that's just not right. So remember to add a few of these wee little beanies to your donations, because they are very much needed and I can tell you from experience, they are very comforting.

Sized To Fit:
12-14 weeks gestation

You Will Need:
Light DK/8ply yarn I used Sirdar Snuggly which is thinner than most 8ply yarns.
4mm hook

All stitches are in American terms.

1: Into a magic ring ch2, hdc 8 times, join to the first hdc. - 8

2: Ch2, 2hdc in each stitch around, join to the first hdc. - 16 (3.5cm/1.3” across)

3: Ch1, 2sc in the first stitch, skip 1 stitch, *2sc in the next stitch, skip 1 stitch*, repeat around, join to the first sc. - 16

4-6: Repeat round 3.

End off, weave in tails.

Finished Measurements: 4cm/1.5” in total height, 4.5cm/1.7” width across the brim


Saturday, September 3, 2016

3. The Emmerson Beanie


Hello hello day 3!

Today's beanie is a variation on yesterdays stitches. I love how sweet and delicate this little beanie is, and I do mean little. Designed for a bub of 16 weeks gestation, this hat will hit easily into the palm of your hand. Of course, you can easily upsize it with a thicker yarn, but you may want to add an extra sc round for more height. 


The Emmerson Beanie

Size:
16 Weeks Gestation

You Will Need:
3.5mm hook
4ply/fingering weight yarn in a main and contrasting colour

All stitches are in American terms.

Special Stitch - dc cluster - yarn over, insert hook in stitch, yarn over, pull through (3 on hook), yarn over, pull through 2, yarn over, insert hook into same stitch, yarn over, pull through, yarn over, pull through 2, (3 on hook), yarn over, pull through all 3 stitches. Cluster complete.

1. Into a magic ring, ch2, dc 8 times, join to the first dc. - 8

2. ch2, 2dc in each stitch around, join. -16

3. ch2, dc in the same stitch, *2dc in the next stitch, dc in the next stitch*, repeat around, 2dc in the last stitch, join. - 24

4. ch2, dc in the same stitch, dc in the next stitch, *2dc in the next stitch, dc in the next 2 stitches* repeat around, 2dc in the last stitch, join. - 32

5. Change to contrasting colour, ch3, dc in the same stitch, ch2, dc cluster in the same stitch, skip 3 stitches, *(cluster, ch2, cluster) in the next stitch, skip 3 stitches*, repeat around, join to the first dc and not the ch3. - 16 clusters total (8 pairs)

6. Change back to main colour, ch1, sc in the same stitch, *2sc in the ch2 space, sc in the next 2 stitches (tops of clusters)*, repeat around, sc in the top of the last cluster, join to first sc. - 32

7. Change to contrasting colour, ch1, sc in each stitch around, join. -32

Finished Measurements: 6.5cm (2.5”) in total height, 9cm (3.5”) across brim.


Monday, September 28, 2015

The Keegan Beanie


Hello hello all and hello too to the 28th day of our 30 days of preemie patterns!

Today's beanie is a basic but sweet little beanie. It has delicate tiny earflaps and a super sweet contrasting pompom. The pompom would be great for using up small pieces of speciality yarn to give it that extra pop.
For those who don't know how to make pompoms, its very simple. I use the fork method for small ones, and there is a great picture tutorial for that right here.


The Keegan Beanie

Sized To Fit:
14-16 Weeks Gestation

Measurements:
7.5cm in height from crown to earflap (not including pompom)
5.5cm in height from crown to brim
8cm in width across the brim

You Will Need:
2.5mm hook
5ply/Sports Weight Yarn in a main and contrasting colour. I used 4 Seasons Marvel in 5ply.

With main colour

1. dc 12 times in a magic ring, join. (12)

2. ch2, hdc in the same stitch, 2hdc in each stitch around, join. (24)

3-6. ch2, hdc in each stitch around, join.

7. ch1, sl st in the next 6 stitches, hdc in the next 3 stitches, ch1, turn, hdc in the next 3 stitches, ch1, turn, hdc3tg. End off.

8. count off 10 stitches to the left of the completed earflap and attach yarn. ch2, hdc in the next 2 stitches, turn, ch1, hdc in the next 3 stitches, ch1, turn, hdc3tg, do not end off.

9. ch1, sc evenly down the side of the earflap, sc in each stitch around, and evenly around the second earflap, back to the ch1 and join. End off and weave in tails.

Make a small pompom  with contrasting colour and attach to the top of the beanie.


Saturday, September 26, 2015

The Gabriel Beanie


Hello beautiful people, and hello to day 26!
Today's beanie is a sweet little newsboy cap. It uses the hdc granite stitch (also called the moss stitch when sc'd) It's a lovely little cap and works up super fast. The Gabriel beanie will fit a bub of 22 weeks gestation. I think it would look extra sweet with a button on the side, but I managed to pack all my buttons ready for the move, oops! The brim on this is big enough to sit out and look like a cap, but not too big that it overshadows bubs face.

The Gabriel Beanie

Sized To Fit:
22 Weeks Gestation

Measurements:
7.5cm total height
12.5 cm in width across the brim, when folded flat, peak included.

You Will Need:
8ply/Light Worsted/DK weight yarn. I used Patons Big Baby which seems to be on the thinner side.
3.5mm hook

1. In a magic ring hdc 10, join. (10)

2. Ch2, *hdc in the next stitch, ch1*, repeat around, join to the first ch. (20)

3. ch3, *(hdc, ch1, hdc), in the next ch1 space, (hdc, ch1), in the next ch1 space*, repeat around, join to the 2nd chain. (30)

4. ch3, (hdc, ch1), in the first ch1 space, (hdc, ch1, hdc, ch1) in the next ch1 space, *(hdc, ch1) in the next ch1 space, (hdc, ch1) in the next ch1 space, (hdc, ch1, hdc, ch1) in the next ch1 space*, repeat around. (40) 

5. ch3, (hdc, ch1), in the first ch1 space, (hdc, ch1) in the next ch1 space, (hdc, ch1, hdc, ch1) in the next ch1 space, *(hdc, ch1) in the next ch1 space, (hdc, ch1) in the next ch1 space, (hdc, ch1) in the next  ch1 space,  (hdc, ch1, hdc, ch1) in the next ch1 space*, repeat around. (50)

6. Slst into the first ch1 space, ch3, (hdc, ch1) in each ch1 space around, join to the 2nd chain. (50)

7-9. Repeat round 6

10- 11. Slst into the first ch1 space, ch2, (sc, ch1) in each ch1 space around, join to the 2nd chain. (50)

12. Slst into ch1, ch3, *(sc, ch1), in the next ch1 space*, repeat 6 more times, skip 1 stitch, 2hdc FRONT LOOP ONLY in the next 11 stitches, (sc, ch1) in the next ch1 space and each remaining ch1 space around, join. 

13. Slst loosely in each sc and ch1 until you reach the hdc's from the previous round, work one tight sc in each hdc stitch, then continue slsting in each  remaining ch1 and sc around, join. End off, weave in tails.

Upload your photos to Ravelry HERE


Tuesday, September 22, 2015

The Anne Beanie


Good morning all and welcome to day 22. Today's beanie, the Anne, is only 6 rounds in total and a super speed one indeed. It features a simple shell stitch and is an easy to remember repeat. The Anne Beanie will fit a bub of 16 weeks gestation.

The Anne Beanie

Sized To Fit:
16 Weeks Gestation

Measurements:
6.5cm in height
7cm width across the brim

You Will Need:
dk/8ply/light worsted weight yarn. I used Sirdar Snuggly BabyBamboo
3.75mm hook

1. Into a magic ring dc 12 times, join. (12)

2. ch3, dc in the same stitch, 2dc in each stitch around, join. (24)

3. ch5 (counts as dc and ch2), 2dc in the same stitch, ch1, skip 2 stitches, sc in the next stitch, *ch1, skip 2 stitches, (dc, ch2, 2dc) in the next stitch, ch1, skip 2 stitches, sc in the next stitch* repeat around, ending with a ch1 and join with a slst to the 3rd chain of the starting ch5.

4. ch1, sc in the first ch2 space (between the dc's), ch1, (dc, ch2, 2dc) in the next sc, *ch1, sc in the next ch2 space, ch1, (dc, ch2, 2dc) in the next sc*, repeat around, ending with a ch1. Join to the first sc.

5. ch5, 2dc in the same stitch, ch1, sc in the next ch2 space, *ch1, (dc, ch2, 2dc) in the next sc, ch1, sc in the next ch2 space*, repeat around, ending with a ch1, join to the 3rd chain of the starting ch5.

6. Repeat round 4

End off, weave in tails.

Add your photos to Ravelry HERE


Sunday, September 20, 2015

The Claire Beanie


Good morning beautiful crafters and welcome to day 20. Today's pattern is so far, the smallest one for the hat drive. Not only is the Claire beanie itty but it also has a bitty flower to go with it. This little gem will fit 10-12 weeks, and is just so petite and delicate.

The Claire Beanie

Sized To Fit:
10-12 weeks gestation

Measurements:
4.5cm total height
4cm width across the brim

You Will Need:
2.5mm hook
3ply/Light Fingering/0 lace weight yarn.

1. dc 8 times into a magic ring, join. (8)

2. ch3, dc in the same stitch, 2dc in each remaining stitch around, join. (16)

3. ch3, dc in the same stitch, *dc in the next stitch, 2dc in the next stitch*, repeat around, join. (24)

4. ch6, dc in the same stitch, *skip 3 stitches, (dc, ch3. dc) in the next stitch*, repeat around, join to the 3rd chain of the starting ch6.

5. slst into the first ch3 space, sc 4 times in the ch3 space, sc 4 times in each remaining ch3 space around, join.

6-7. Repeat rounds 4-5

End off, weave in tails

Optional Flower

You will need:
size 8 cotton thread
1.5mm hook

1. ch2, sc 5 times in the 2nd chain from hook, join.
2. ch1, (2dc, ch1, slst) in the same stitch as the first chain, *(slst, ch1, 2dc, ch1, slst)* in each remaining stitch, end off leaving a long tail.

Sew flower to hat.

Add your photos to the Ravelry page HERE


Saturday, September 19, 2015

The Noah Beanie


Good morning all and welcome to day 19. Wow guys, we are powering through the month.
Today's beanie is the Noah beanie. It uses a pretty fun stitch, that made around the post of the previous one. The Noah beanie will fit a bub of 18 weeks gestation. I think it would also look great with a contrasting colour for the sc rounds.

The Noah Beanie

Sized To Fit:
18 weeks gestation

Measurements:
5cm diameter crown after round 3
7.5cm in height
9cm width across brim

You Will Need:
3mm hook
5ply/sports weight yarn. I used 4Seasons Marvel 5ply

1. hdc into a magic ring 12 times, join. (12)

2. ch2, hdc in the same stitch, 2hdc in each stitch around, join. (24)

3. ch2, hdc in the same stitch, hdc in the next stitch, *2hdc in the next stitch, hdc in the next stitch*, repeat around, join. (36)

4. ch2, *skip 1 stitch, hdc in the next stitch, hdc around the post of the hdc you just made*, repeat around, skip the last stitch, ch1, join.  (36 including ch at the end)

5. ch1, sc in each stitch around, including the last ch, join.

6-11. repeat rounds 4 and 5

12. ch2, hdc in each stitch around, join

End off, weave in tails.


Tuesday, September 15, 2015

The Rose Bonnet


Morning peeps! Today is day 15, and that means we've officially hit the half way mark. Exciting stuff indeed. Don't forget if you are uploading photos anywhere online to tag them #ittybittygianthatdrive I love checking out the hashtags and seeing them all on different platforms.

Today's bonnet is  a stunning and dainty little bonnet, for a bub all of 14 weeks gestation. I love this pattern, and hope to have a few pieces to match down the track. I was going to put a small organza flower on it, but then I realised I'd already packed them all, whoops!

The Rose Bonnet

Sized To Fit:
14 weeks gestation

Finished Measurements:
Crown 4cm across at the completion of round 3.
5.5cm wide (crown to brim)
6.5cm height.

You Will Need:
2mm hook
4ply/fingering weight yarn.
I am using Bella Baby Marvel Soft Baby

1. Into a magic ring hdc 9 times, join. (9)

2. ch2, hdc in the same stitch, 2hdc in each stitch around, join. (18)

3. ch2, *2hdc in the next stitch, hdc in the next stitch*, repeat around, do not join (27)

4. ch1, turn, in the first stitch (slst, ch3, 2dc), shell made *skip 2 stitches, (slst, ch3, 2dc) in the next stitch, repeat around, sc in the last stitch. (9 shells)

5. ch1, turn, (slst, ch3, 2dc) in the sc, *in the ch3 space of the next shell (slst, ch3, 2dc), repeat across, when you reach the last shell, sc in the ch3 space.

6-9. repeat row 5

10. do not turn, ch1, sc evenly along the base of the bonnet (neck area) when you reach the corner chain 28. End off. Join yarn to opposite corner and chain 28 for the second tie.


Saturday, September 12, 2015

The Tina Beanie


Good morning all!
Another day, another beanie. We're inching closer to the halfway mark now. Today's beanie, the Tina, is an itty bitty hat indeed, measuring just 5.5cm in height, thats just over 2 inches for you non metric folk. Its such a simple but pretty hat, and one that works up with barely any yarn at all. Perfect for the #ittybittygianthatdrive

The Tina Beanie

Sized To Fit:
14-16 weeks gestation

Finished Measurements:
6.5cm across brim
5.5cm in height

You Will Need
3.5mm hook
4ply/fingering weight yarn

Special Stitch: V Stitch - dc, ch1, dc in the same stitch

1. hdc 8 times into a magic ring, join - (8)

2. ch2, hdc in the same stitch, 2hdc in each stitch around, join. (16)

3. ch2, *hdc in the next stitch, 2hdc in the next stitch around*, repeat around, join. (24)

4. ch3, dc in the same stitch, *skip 1 stitch, (dc, ch1, dc) in the next stitch*, repeat around, join.

5. ch4 [counts as sc+ch3], skip the first dc and ch1, sc between the next 2 dc's (between the v stitches), *ch3, sc between the next V stitches*, repeat around, join.

6. slst into the ch3 space, (ch3, dc) in the same ch3 space, *(dc, ch1, dc) into the next ch3 space*, repeat around, join.

7-9. Repeat 5-6

10. slst into the ch3 space, (ch2, dc) in the same ch3 space, *(hdc, ch1, hdc) into the next ch3 space*, repeat around, join.

11. ch1, sc in each stitch around, join.

End off, weave in tails.


Thursday, September 10, 2015

The Vincent Beanie


Hello hello!
Wow day 10, double figures. Doing good all! Have you popped over to check out the Itty Bitty Webpage yet? Don't forget to grab the posting form while you are there.

Today's sweet little beanie packs a punch texture wise. A simple 2 round repeat is all it takes, and it is so very quick too! This beanie uses such a small amount of yarn, its a great stashbuster.

The Vincent Beanie

Sized To Fit:
22-24 Weeks Gestation

Finished Measurements:
8cm total height from top to bottom
10cm across the widest section

You will need
3.5mm hook
Dk/Light Worsted/8ply/weight 3 yarn.
I used King Cole CottonSoft

1. In a magic ring dc 10 times, join. (10)

2. ch2, dc in the same stitch, 2dc in each stitch around, join. (20)

3. ch2, dc in the same stitch, *dc in the next stitch, 2dc in the next stitch*, repeat around, join. (30)

4. ch1, fpdc around the chain from the previous round, *bpdc around the next stitch, fpdc around the next stitch*, repeat around, join.

5. ch1, bpdc around the first fpdc from the previous round, *fpdc around the next stitch (will be a bpdc), bpdc around the next stitch (will be a fpdc)*, repeat around, join.

6-9. Repeat rounds 4-5

10. ch2, hdc in each stitch around, join.

Finish off, weave in ends.