Friday, January 31, 2014

Charlotte and Charlie Cocoons


Good morning lovelies!

Today's pattern is a very special one. It comes from the lovely Lisa of Crochet Quackers. You can find her Facebook page filled with her fun creations right HERE
Lisa is often my go to for bouncing ideas around, and asking for opinions on how things look and what needs to be improved. She is also an amazing crocheter and knitter! We share a love for making preemie items and in fact that is how we got chatting to begin with!
Lisa has been working on some crocheted cocoon patterns, and so for as many as she comes up with, we'll be releasing one the blog for the last Friday in every month. If you enjoy her cocoon patterns, please pop on over to her Facebook page and say Hi! I'm sure she would love some feedback!


Sizing:
Please note, these are Micro Preemie Cocoons, designed as burial buntings for the very small. They are not designed for full term newborn babies.

Using DK weight yarn and a 5.5mm hook, the finished cocoon measures 19cm long and 10cm wide and will fit 16-18 weeks gestation

Using DK weight yarn and a 4.5mm hook, the finished cocoon measures 17cm long and 9cm wide and will fit 14-16 weeks gestation.

You will need:
8ply Yarn
5.5mm hook
a button

1: ch 5, join with sl st to form a ring

2: ch 3, (counts as first dc now and throughout), 7 dc times into the ring, join (8 dc)

3: sl st to space between first two dc's, ch 3, dc in same space, 2 dc in each space around, join (16 dc)

4: sl st to the space between the first two sets of  2dc's, ch 3, 2 dc in same space, 3 dc in between each set of two dc's around around, join. ( 8 x 3 dc) granny pattern started.

5: sl st across to the next gap between the 3dc clusters, ch3, dc twice more in the same gap, 3dc between each remaining group of 3dc clusters *DO NOT JOIN*

now working in rows

6: ch 3, turn, 3dc in first space between dc clusters, and in each space around, dc in top of tthe very last stitch, (this creates a space at the end of the row)

7-15:  ch3, turn,  2 dc in first space, 3 dc in each space across, 2 dc in last space and dc in turning chain.

End off main colour.

Finishing Options:


For the Charlotte: Join contrasting colour in any space along the top, ch3 and dc twice more in the same space, *sl st to the 2nd (middle) stitch of the next ch3 cluster, dc 3 times in the next space* repeat around the entire cocoon, join.


For the Charlie: Join contrasting colour in any space along the top, ch3 and dc twice more in the same space, dc 3 times in each space around, when you get to the bottom of the split, dc once in the middle of the ch3 cluster then continue with 3dc's in each space. Join.

Attach buttons as desired.

Monday, January 27, 2014

Watermelon Pouch


 Good morning!

Today's Pattern is such a fun little item, a small pouch! Great for many number of things. We keep dice in ours, but they would also be great to hold a few small tampons too.


This pattern uses beads, and for those of you familiar with them, this wont be a problem, but if you haven't used beads before you will need a bit of a lesson. Now I could type out a lengthy description on how to do this, but I think it would be easier to show you a video so, Here is a fantastic one by the Crochet Crowd.


The trick to getting these beads to look like seeds is to give them random placement. So! The instructions do not tell you when to add the beads, just place them where it feels right for you. I used 5 on this particular one, but they were rather largish beads, and had I used smaller ones I would have added some more.

Supplies:
DK 8ply yarn in pink, green and white
5mm crochet hook for pouch
3mm crochet hook for tie
black beads
Needle that will pass through the bead

Thread beads onto your pink yarn
1: ch2, hdc in the first ch 10 times, join.
2: ch2, 2hdc in each stitch around, join
3-4: ch2, hdc in each stitch around, join.
End pink yarn and join white
5-6: ch1, sc in each stitch around, join
End white yarn and join green
7: ch3, 2dc in each stitch around, join.
End off and weave in all loose ends.

Tie
ch70. Weave tie in and out of the stitches of round 6. Pull to gather and tie a bow.

Friday, January 24, 2014

Dustins Sleeper Gown - Free Crochet Pattern


Hello everyone!

Back today with a pattern designed for the boys. It would work for girls too, but I really wanted something else for the little men. I know patterns for boys are so few and far between so I really want to add quite a few this year. This is what Ive always known as a "sleeper" The gathered bottom, open up the middle style, and so I thought Id stick with that as a name. Suitable for burial and for prems or as a memento, and of course as dolls clothing, which I know a lot of you use my patterns for as well :) This one is pretty easy to adjust sizing, up or down with a hook change, just remember to add a fair bit more length if you go up in size.
If you make it as directed, it will come out sized for a preemie between 26 and 30 weeks gestation.


You will need:
3.5mm hook
5ply/Sports weight yarn in a main colour (I used Moda Vera Alpine Spritz in a grey/white)
5ply/Sports weight yarn in a contrasting colour for the sleeves
2-3 buttons
Sewing needle
length of ribbon or yarn to gather bottom.

1: ch38, dc in the 3rd chain from hook and the next 5 chains, (dc, ch2, dc) in the next stitch, dc in the next 5 stitches, (dc, ch2, dc) in the next stitch, dc in the next 10 stitches, (dc, ch2, dc) in the next stitch, dc in the next 5 stitches, (dc, ch2, dc) in the next stitch, dc in the last 6 stitches.

2: ch3, turn, dc in the first 7 stitches, (dc, ch2, dc) in the ch2 space, dc in the next 7 stitches, (dc, ch2, dc) in the next ch2 space, dc in the next 12 stitches, (dc, ch2, dc) in the next ch2 space, dc in the next 7 stitches, (dc, ch2, dc) in the next ch2 space, dc in the last 7 stitches (last stitch into the ch3 from the 1st row).

3: ch3, turn, dc in the first 8 stitches, (dc, ch2, dc) in the ch2 space, dc in the next 9 stitches, (dc, ch2, dc) in the next ch2 space, dc in the next 14 stitches, (dc, ch2, dc) in the next ch2 space, dc in the next 9 stitches, (dc ch2, dc) in the next ch2 space, dc in the last 8 stitches

4: ch3, turn, dc in the first 9 stitches, dc in the ch2 space, ch2, skip all dc's until the next ch2 space and then dc in that, dc in the next 16 stitches, dc in the ch2 space, ch2, skip the next lot of dc's and dc into the next ch2 space, dc in the remaining 9 dc's.

5: ch3, turn, dc in each stitch (including ch's) across

6: ch3, turn, *dc in the first stitch, 2dc in the next stitch* repeat across

7: ch3, turn, dc in each stitch across.

Repeat row 7 until your gown measures 10 to 11 inches long from the neck to the bottom. End odd and weave in ends.

Adding the Sleeves
1: Join contracting yarn to any stitch on the arm hole and ch2, evenly hdc around the entire armhole opening, join. (for me, this was 20 stitches)
2-9: ch2, hdc in each stitch around, join.
Finish off and weave in ends.

Repeat 1-9 for the second sleeve.


FINISHING
Using a piece of ribbon ir yarn, weave in and out of the stitches on the last row of the gown, and pull tight to gather. Tie in a bow.

Attach 2-3 buttons to the front to close, there will be some overlap, this is fine.

Fold the corners of the neck down to make a collar. Tack into place with a piece of yarn and a sewing needle. Weave in ends.

Monday, January 20, 2014

Salad Roll - Free Crochet Pattern


Good morning lovlies!

One of the more frequent requests from my girls is for playfood and Ive done quite a bit of it in the past for them, but I never really thought to write much of it down. The time has come to add some more items to the pretend play box, so I figure I'll ask the girls what items they want and go from there.

The first playfood request came from Miss 8 who wanted a salad roll for her dolly to take on a picnic, so here it is!


You will need:
3mm hook
DK weight (8ply) yarn in small amounts
stitch marker
stuffing


FILLINGS:
Tomato:
1: ch2, sc into the 2nd chain from hook 8 times, join
2: ch1, sc twice in each stitch around, join
3: ch3, *sk1, dc twice in the next stitch, ch1* Repeat around, dc into the same stitch as the starting chain, join.
4: ch1, sc in the same stitch, 2sc in each stitch or chain around, join.

Lettuce:
1: ch2, sc 6 times in the 2nd chain from hook, place marker
2: sc twice in each stitch around
3: *2sc in the first stitch, sc into the next stitch* Repeat around
4: *2sc in the first stitch, sc into the next 2 stitchs* Repeat around
5: *2sc in the first stitch, sc into the next 3 stitchs* Repeat around, sl st to the next stitch
6: ch3, dc twice in the same stitch as starting chain, 3dc in each stitch around, join.

Ham Slice:
1: ch2, hdc 9 times into the 2nd chain from hook, join.
2: ch2, hdc twice in each stitch around, join.
3: ch2, *2hdc in the first stitch, hdc in the next stitch*, repeat around, join.
4: ch2, *2hdc in the first stitch, hdc in the next 2 stitchs*, repeat around, join.
5: ch2, *2hdc in the first stitch, hdc in the next 3 stitchs*, repeat around, join.

Boiled Egg Slice:
1: ch2, sc 8 times into the 2nd ch from hook, place marker.
2: sc twice in in each stitch around
3: *sc in the first stitch, 2sc in the next stitch*, repeat around. Sl st to the next stitch.
End yellow and join white
4: ch2, *hdc in the first 2 stitches, 2hdc in the next stitch*, repeat around, join.

Onion Rings:
1: ch20, join to make a loop
2: ch2, hdc 30 times into the loop, join.


Bun: Top Piece
1: ch2, sc 8 times in the 2nd chain from hook, place marker
2: 2sc in each stitch around
3: *sc in the first stitch, 2sc in the next stitch*, repeat around
4: *sc in the first 2 stitches, 2sc in the next stitch*, repeat around
5: *sc in the first 3 stitches, 2sc in the next stitch*, repeat around
5: *sc in the first 4 stitches, 2sc in the next stitch*, repeat around
6: *sc in the first 5 stitches, 2sc in the next stitch*, repeat around
7-8: sc in each stitch around
9:  In the back loops only *sc in the first 5 stitches, sc2tg*, repeat around
10: *sc in the first 4 stitches, sc2tg*, repeat around
11: *sc in the first 3 stitches, sc2tg*, repeat around
12: *sc in the first 2 stitches, sc2tg*, repeat around
13: *sc in the first stitch, sc2tg*, repeat around
Stuff well, pushing stuffing into the top of the bun so it has a rise
14: sc2tg around
sl st to the next stitch and end off leaving a 3 inch tail. Using the tail weave in and out of the last round of stitches and pull tight to gather closed.

Bun: Bottom Piece
1: ch2, sc 8 times in the 2nd chain from hook, place marker
2: 2sc in each stitch around
3: *sc in the first stitch, 2sc in the next stitch*, repeat around
4: *sc in the first 2 stitches, 2sc in the next stitch*, repeat around
5: *sc in the first 3 stitches, 2sc in the next stitch*, repeat around
5: *sc in the first 4 stitches, 2sc in the next stitch*, repeat around
6: *sc in the first 5 stitches, 2sc in the next stitch*, repeat around
7: sc in each stitch around
8: *sc in the first 5 stitches, sc2tg*, repeat around
9: *sc in the first 4 stitches, sc2tg*, repeat around
10: *sc in the first 3 stitches, sc2tg*, repeat around
11: *sc in the first 2 stitches, sc2tg*, repeat around
12: *sc in the first stitch, sc2tg*, repeat around
Stuff lightly
13: sc2tg around
sl st to the next stitch and end off leaving a 3 inch tail. Using the tail weave in and out of the last round of stitches and pull tight to gather closed.


Friday, January 17, 2014

Small Diaper for MicroPrems


Hello beautiful people,

Today I have a little diaper pattern for you. Designed mainly because I have some friends that wanted to make some, but couldn't sew. If you can sew and would prefer to then you can find the pattern for the cloth diaper HERE on the Teeny Tears blog. I have used this sewing pattern numerous times and it is fantastic.

This pattern will make a diaper that should fit from around 22-28 weeks gestation. I have not added buttons, and use safety pins, simply because adding buttons makes the size fixed, and this diaper needs to be able to be adjusted depending on the babies abdomen measurements to ensure a cozy fit. I will have some more sizes and variations available down the track. You CAN upsize this to a 4 and 5mm hook, but just check that the yarn you use isn't too thin, we don't want the fabric to be too gappy. 


You will need:
3.5mm hook
DK (8ply) yarn in a main and contrasting colour
2 small safety pins

1: ch28, hdc in the second chain from hook and each across (27)
2: ch2, turn, hdc in each stitch across
3: ch1, turn, sl st in the first 3 stitches, hdc in the next 21 stitches, leave the last 3 stitches unworked (21hdc's)
4: ch2, turn, hdc in each stitch across
5: ch2, turn, hdc2tg, hdc in the next 17 stitches, hdc2tg (19)
6: ch2, turn, hdc2tg twice, hdc in the next 11 stitches, hdc2tg twice more (15)
7: ch1, turn, sl st in the first 2 stitches, sc2tg, hdc in the next stitch, hdc2tg, hdc in the next stitch, hdc2tg, hdc in the next stitch, sc2tg, leaving the last 2 stitches unworked (7)
8: ch2, turn, hdc2tg, hdc in the next 3 stitches, hdc2tg (5)
9-11: ch2, turn, hdc in each stitch across
12: ch2, turn, hdc twice in the first stitch, hdc in the next 3 stitches, hdc twice in the last stitch (7)
13: ch2, turn,  hdc twice in the first stitch, hdc in the next 5 stitches, hdc twice in the last stitch (9)
14: ch2, turn,  hdc twice in the first stitch, hdc in the next 7 stitches, hdc twice in the last stitch (11)
15: ch2, turn,  hdc twice in the first stitch, hdc in the next 9 stitches, hdc twice in the last stitch (13)
16-17: ch2, turn, hdc in each stitch across
18: ch2, turn,  hdc twice in the first stitch, hdc in the next 11 stitches, hdc twice in the last stitch (15)
19: ch2, hdc in each stitch across.

End off main colour and weave in all tails.
Join your contrasting yarn to anywhere on the edge of the diaper and hdc evenly around the entire piece. Make sure to do 2hdc's in the corners to help with turning. End off and weave in tails.

Monday, January 13, 2014

Citrus Tic-Tac-Toe - Free Crochet Pattern


Hello hello lovlies!

My kiddoes, they LOVE playing tic tac toe (or noughts and crosses, whichever you prefer) but they use SO. MUCH. PAPER. doing so! In an effort to cut back on the paper consumption, I decided that what we really needed was a new way to play. TADAA! A crocheted tic-tac-toe board, in fun summer colours and complete with beach rocks for markers.


This set really is pretty simply to make. I sewed my squares together but if I made one again, I think I'd change to a join as you go method, simply to make it a little easier. The board is built using basic granny squares, so if you know how to make them already, you can skip half of the instructions straight up! I probably should have blocked this, to make the board more straight and even, but you know what, kids don't care about straight and even :D


The verdict? Well I gave it to them an hour ago, not a peep yet so I'd call that a winner and if it gets dirty, it can be popped into the wash.

You will need:
4.5mm hook
3mm hook (for stone covers)
DK (8ply) yarn in 9 colours for the board, white for the edging and 2 more contrasting colours for the stone covers.
10 stones for markers. Mine are roughly 3-4cm across.

Making the squares: With one of your 9 board colours:

1: ch4, join

2: In the ch4 loop, ch3, dc twice, ch2, *dc 3 times, ch2*, repeat twice more, join.

3: sl st in the next dc and then into the ch2 space. (ch3, 2dc, ch2, 3dc) in the ch2 space, *ch1, (3dc, ch2, 3dc) in the next ch2 space* Repeat twice more, join. End colour.

Join white in any ch2 space:
4: (ch3, 2dc, ch2, 3dc) in the ch2 space, *ch1, (3dc, ch2, 3dc) in the next ch2 space, ch1, 3dc in the next ch1 space* Repeat twice more, join.
End off white
Weave in ends.

Repeat this 8 more times for a total of 9 squares. Sew the squares together so that your board is 3x3

5: Join white yarn to the edge of the board and ch3, dc evenly around the entire board, being sure to (dc, ch2, dc) in each of the 4 corners. End this colour

6: Change to one of the colours in the board and ch2, hdc evenly around the entire boars, being sure to (hdc, ch2, hdc) in each of the 4 corners. End this colour

7: Change to one more colour from your board and repeat round 6 once more.

End off and weave in all loose ends.

STONE COVERS
With a contrasting colour and a 3mm hook:
1: ch10, join.
2: ch6 (first dc and ch3), *dc into the loop, ch3* 4 times, ch3, join to the 3rd chain from the first 6.
3:ch6 (first dc and ch3), *dc into the next dc, ch3* 4 times, ch3, join to the 3rd chain from the first 6.

Tuck the stone inside the cover and turn upside down. Chain 3-5 stitches(depending on the size of your stone) to use as a strap. sl st to the dc on the opposite side of the stone. You want your chain stitches to be short enough so that the strap will pull tight to keep the stone in place. End off.

Make 4 more markers this way, then repeat with the last 5 stones using a different contrasting colour.

As you can see, I did one set with 8ply/dk and a second set with thread, both worked fine. If your rocks are smaller, drop a hook size to make the covers.

Thats it! You are done, now do play a few rounds!

Friday, January 10, 2014

Lyra Gown - Free Crochet Pattern


Good morning lovlies,

Today's prem pattern is another little gown. I really love the delicate look of this one, the ribbon with the open fan stitching is just so pretty.
It does take a little more time then a standard gown, but I think it is totally worth it.

This gown is sized to fit around 22-26 weeks gestation, but like usual, upping the hook size and/or yarn size will increase the overall size of the gown. Just remember that if you want to make it larger, you will also need to increase the length.


STITCHES IN (BRACKETS) ARE WORKED INTO THE SAME STITCH


You will need:
3.25mm hook
DK (8ply) yarn
1 small button
Length of thin ribbon
1 small satin bow

1: ch24, dc in the 2nd st from hook, 2dc in the next st, *dc, 2dc in the next stitch*, repeat across ~(33)
2: ch2, turn, *dc in the 1st 2 stitches, 2dc in the next stitch*, repeat across ~(44) (last stitch worked in turning chain from previous)
3: ch2, turn, *dc in the first 3 stitches, 2dc in the next stitch* repeat ~(55)
4: ch2, turn, dc same and next 7 stitches, ch2, sk 12, dc 15, ch2, sk12, dc last 8 ~(35 including chains)
5: ch2, turn, hdc in each stitch across (including the ch's) ~(35hdc)
6: ch3, turn, 2dc in each of the first 17 stitches, 4dc in the next stitch, 2dc in each of the remaining 17 stitches (72dc's total)

7: ch5, turn, skip the first stitch and sc in the second one, skip the next 3 stitches, dc into the next stitch, (ch2, dc into the same stitch) 3 times, skip the next 3 stitches, sc into the next stitch, *ch5, skip 3 stitches, sc into the next stitch, skip 3 stitches, dc into the next stitch, (ch2, dc into the same stitch) 3 times, skip 3 stitches, sc into the next stitch* Repeat from *to* across until the last 2 stitches, ch2, skip one stitch, dc into the last stitch.

8: ch1, turn, sc into the first stitch, ch1, sc into the next ch2 space, dc 3 times in the next ch2 space, (ch2, 3dc into the next ch2 space) twice more, *(sc, ch3, sc) into the ch5 space, 3dc into the next ch2 space, (ch2, 3dc into the next ch2 space) twice more* Repeat across until the last ch2 space, sc in the last ch2 space, ch1, sc in the top of the turning ch from previous round.

9: ch4, turn, (dc, ch2, dc) in the first ch1 space, sc into the ch2 space, ch5, sc into the next ch2 space, *dc into the next ch3 space, (ch2, dc into the same space) 3 more times, sc into the next ch2 space, ch5, sc into the next ch2 spcae* repeat across until the last ch1 space, (dc, ch2, dc) into the last ch1 space, ch1, sc in the last sc.

10: ch3, turn, dc in the first ch1 space, ch2, 3dc into the next ch2 space, (sc, ch3, sc) into the next ch5 space, 3dc in the next ch2 space, *(ch2, 3dc into the next ch2 space) twice, (sc, ch3, sc) in the next ch5 space, 3dc ub the next ch2 space* Repeat across until the last ch1 space, dc in the last ch1 space, dc in the last stitch.

11: ch5, turn, sc in the first ch2 space, dc in the the next ch3 space, (ch2, dc in the same space) 3 times, sc in the next ch2 space, *ch5, sc in the next ch2 space, dc in the next ch3 space, (ch2, dc in the same space) 3 times, sc in the next ch2 space* repeat across until the last 2 dc's, ch2, skip one dc, sc in the last.

Repeat rows 8-11 once more
Repeat row 8 to finish. End off weave in ends.

*If making this dress larger, repeat 8-11 and 8 once more again.*

Weave the ribbon in and out of the stitches on row 6. I weave mine in and out of every second stitch, but every stitch or even every 3 stitches will also work, try them out and see which appeals to you more. Use the ribbon to help tie the gown at the back. 

Attach a small button to the top of the gown for closing.

Sew a small satin bow to the front of the dress, on row 3. 

Monday, January 6, 2014

Balls - Free Crochet Pattern


Hello everyone!

In 2012, my girls and I worked hard to fill a box full of pet toys for our local shelter, that we dropped off at Christmas time. Last year (2013) we wanted to do the same thing. This time tho, we wanted to concentrate on toys for both cats and dogs, and on something that was quick, easy and used up old yarn. These balls are really simple to make, and their 3 strand togetherness makes for both fast stash-busting, and durability. The larger balls are great for fetch and the smaller ones perfect for kitties.
Of course, they also make great inside balls for kids too!

You will need:
6.5mm hook
3 strands of yarn. I use mostly DK weight, but have some with funfur, thin cottons and chunkier yarns.
sewing needle
Some stuffing
Stitch marker

Small Ball
1: ch2, sc 8 times into the first chain (or magic circle), place marker
2: sc twice in each stitch around
3-5: sc in each stitch around
6: sc2tg around, end off leaving a long tail.
Stuff the ball
Weave your tail in and out of remaining stitches and pull tight to gather closed. Weave in all ends.

Medium Ball
1: ch2, sc 8 times into the first chain (or magic circle), place marker
2:  sc twice in each stitch around
3: *sc in the first stitch, 2sc in the next stitch* Repeat around
4-8: sc in each stitch around
9: *sc, sc2tg* repeat around
10: sc2tg around, end off leaving a long tail.
Stuff the ball
Weave your tail in and out of remaining stitches and pull tight to gather closed. Weave in all ends.

Large Ball
1: ch2, sc 8 times into the first chain (or magic circle), place marker
2:  sc twice in each stitch around
3: *sc in the first stitch, 2sc in the next stitch* Repeat around
4: *sc in the first 2 stitchs, 2sc in the next stitch* Repeat around
5-10: sc in each stitch around
11: *sc in the first 2 stitches, sc2tg*, repeat around
12:: *sc, sc2tg* repeat around
13: sc2tg around, end off leaving a long tail.
Stuff the ball
Weave your tail in and out of remaining stitches and pull tight to gather closed. Weave in all ends.

Friday, January 3, 2014

Kalia Gown - Free Crochet Pattern


Hello all and welcome. First pattern for 2014, how exciting! Id like to start by saying hi! to all the new peeps popping in and a super warm welcome back to all my regular readers.

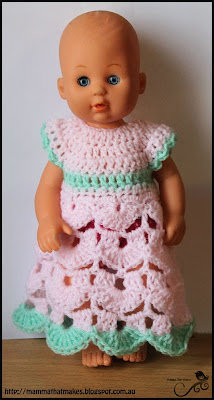
Today's pattern is a little burial gown. This one is a little more in depth then some of my previous ones, but once you have the rows down, it is pretty easy. It features a nice lacy stitch and the little sections of contrasting colour break it up nicely.

This pattern was updated on 18/02/2017

Add your photos to Ravelry here


Kalia Gown

You will need
4mm, 4.5mm and 5mm hooks
DK weight (8ply) yarn in main and contrasting colours.

Sized To Fit:
24-26 Weeks Gestation (1.5 - 2 lbs)

Starting chains are counted within the stitch count.

With main colour and a 4mm hook

1: Ch24, dc in the 3rd chain from hook, 2dc in the next stitch, *dc in the next stitch, 2dc in the next stitch*, repeat across. - 34dc

2: Ch3, turn, *dc in the 1st 2 stitches, 2dc in the next stitch*, repeat across, working the last stitch into the turning chain from the previous row (here and throughout). - 45dc

3: Ch3, turn, *dc in the 3 stitches, 2dc in the next stitch* repeat across. - 56dc

Change to contrasting colour

4: Ch3, dc in the next 7 stitches, ch2, skip 12 stitches, dc in the next 15 stitches, ch2, skip 12, dc in the last 9 stitches. - 36 stitches (counting chains)

Change to main colour

5: Ch2, turn. *2hdc in the next stitch, 2sc in the next stitch,  sc in the next 3 stitches, 2sc in the next stitch*, repeat across, skipping the chains from the previous row, 2sc in the last stitch - 48 stitches

6: Ch2, turn, sc in the next stitch, 2sc in the next stitch, *sc in the next 2 stitches, 2sc in the next stitch*, repeat across. - 64sc

7: Ch1, turn, skip 3 stitches, dc 9 times in the next stitch, skip 3 stitches, sc in the next stitch,*skip 3 stitches, dc 9 times in the next stitch, skip 3 stitches, sc in the next stitch*, repeat across for a total of 8 shells.

8: Ch6 (counts as first dc and ch3), turn, *skip the next 4 stitches, dc in the next stitch (middle of the shell), ch3, skip the next 4 stitches and dc into the next stitch, ch3*, repeat across.

9: Ch3, turn, *3dc in the next ch3 space, ch1* repeat across, dc in the 3rd chain of the previous rounds ch6.

10: Ch1, turn, skip the first ch1, *skip the next 3 stitches, 9dc in the next ch1 space, skip the next 3 stitches, sc in the next ch1 space* repeat across, skip the last ch1 space and sc in the last stitch.

11-12: repeat rows 8 and 9

Change to a 4.5mm hook

13: Repeat row 10

14-15: Repeat row 8 and 9 again. End off main colour and weave in all tails.

16: Join contrasting colour and change to a 5mm hook. Repeat round 10 one last time.


Edging sleeves

With contrasting colour and 4mm hook; Join yarn to the same stitch that the 8th stitch on contrasting row 4 is joined too, and dc in the same stitch, ch1, sl st in the next stitch *dc in the next stitch, ch1, sl st in the next stitch* repeat 5 more times for a total of 7 small shells. End off, weave in tails.

Repeat the process on the other sleeve.

Weave in all ends. Can be closed with ties or a button.

For added neatness you can join your main colour yarn to the bottom corner of the back of the gown and evenly sc up the side to the neckline. Repeat for the second side.