Wednesday, September 26, 2012

Atraya Booties - Free Crochet Pattern


New booties today. Actually, this pattern was kind of a happy mistake. I was aiming for a bonnet (trying to be a smarty and start with a closed back) but it turned into booties! It's name, comes from a random fantasy name generator, because I really REALLY struggle thinking of names. Ahh  generators, so much fun.


Anyway, today's booties are open heeled and feature a gathered toe and a built in strap. I think they would be ok for either gender but they look particularly cute in blue. The gathered toe may take a little concentration but once you see the pattern it takes no time at all, in fact I can make an entire bootie in about 10 minutes. They will fit 32-34 weeks gestation and are just under 3 inches in length.


You will need:
dk weight (8ply) yarn
4mm hook
needle for weaving in ends


Atraya Booties Make 2

1. ch11, hdc in the 2nd chain from hook and next 8 chains, 3hdc in the last st, DO NOT TURN working on the opposite side of the chain, hdc in each st to the end (8hdc), do not join, ch2, turn.

2. hdc in each st around, ch2, turn

3. repeat above row

4. ch3, turn, dc in the next 6 stitches, (gathered toe, yo, insert hook, yo, pull through (3 on hook)yo, pull through 2 (2 on hook) yo, insert, yo, pull through (4 on hook)yo, pull through 2, (3 on hook) yo, insert, yo, pull through, yo, pull through 2, (4 hook)yo, insert, yo, pull through (6 hook), yo pull through 2, (5 hook), yo, insert, yo, pull through, yo, pull through 2, yo, insert, yo, pull through (8 hook) yo, pull through 2, (7 hook) yo, insert, yo, pull through, yo, pull through 2 (8 hook) yo, pull through all stitches), ch1, dc last 6

5. ch1, turn, sc 4, ch3, skip (2 stitches, the chain from the gather, and the next 2 stitches) sc in the last 4

6. the next row will be worked around the HEEL of the bootie. ch1, sc 12 times evenly across the heel, ch1, turn

7. sc 4, sc2tg twice, sc 4

End off and weave in ends.

add ties of ribbon or chained lengths of yarn. I sl st to the corner and ch18 on each side to have ties connected to the bootie

Thursday, September 13, 2012

Lavani Moses Basket


Before I get started with this pattern, Did you notice my new tab up above? Ive created pages that provide a quick list of all my patterns, so you can find them easier and don't have to scroll through the entire blog to find the one you want. So happy with it :)

As promised, here is another little bed.  I named this one the Lavani Moses Basket, as Lavani means "Grace" and I thought that was fitting. This one will fit a bub up to about 16 weeks gestation. It can however be made as large as you like by increasing the base.

You will see a pattern forming on the base where the increase stitches are, they go up by 1 every round so if you just keep increasing at the same rate you can make this bed as large as you choose. Just remember that the larger the bub inside, the heavier it will be so be sure to make an adequate mattress for the bed to help with stability. You may also like to add a few increases to the height if you are making it larger.

I tried to keep this one simple while still adding some dainty trim. The trim is really what sets these little beds off and makes them special.

 Ok so you will need:
2 strands of DK weight (8ply) yarn in main colour
1 strand of yarn in a contrasting colour
5.00mm hook
Needle for darning
10 small pearls or decorations if you wish to add them (and a way of sticking them on)
To make the mattress for the bed please refer to THIS POST


Bed:

1: ch18, dc 3 times in the 3rd ch from hook, dc in the next 14 chains, 4dc in the end chain, do not turn, working round the corner, on the opposite side of the chain, dc in the next 14 stitches, join.

2: ch3, 2dc in the same st and the next 3 stitches, dc in the next 14 st, 2dc in the next 4 stitches, dc in the next 14 st, join

3: ch2, dc in the same st, *dc, 2dc in the next* 4 times (total of 12dc) dc next 13, *2dc, dc* 4 times (12 dc) dc next 14 stitches, join

4: ch2, *2dc, dc, dc* 4 times (16dc) dc in the next 14 st, *2dc, dc, dc* 4 times (16dc) dc in the next 14 st, join.

5: ch2, hdc in the back loops only of every stitch around (60hdc)

6 - 10: ch2, hdc in each st around, join.

End off main colour and weave in all ends.


Trim:
With dk OR baby yarn and a 5mm hook

Join yarn to the front loop that was leftover (unworked) from round 5, in the same st you joined chain 1, hdc, dc, hdc, sc, *sl st in the next stitch, in the next stitch do (sc, hdc, dc, hdc, sc)* (this created a small shell) repeat around, join with a sl st and end off.

Join yarn to the top of the cradle and sc around, join.

In the FRONT loop *sl st in the next 2 stitches, in the next stitch (sc, hdc, dc, hdc, sc)* Repeat this around, join and end off, weaving in all ends.

I also added small "pearl" hearts to every other shell around the top for a little something extra.
2 or 3 of my shell stitches on the top part of the trim sat up a little more then I liked, so a quick dab on the back with the glue gun and pushed them down so they sat against the bed and problem solved :D


Wednesday, September 12, 2012

Serenity Moses Basket - Free Crochet Pattern


As I wrote before in my other cradle pattern, I felt there was a big gap missing with free angel baby bed patterns. In fact, after some searching it appears that there just isn't that many out there, much less any that are free. I decided this needs to change and after talking with some lovely ladies and playing with ideas, I have decided to create an entire line of Moses basket patterns specifically for wee ones.

It breaks my heart to think that hundreds of babies every week come into this world sleeping and the parents have no bed to rest them in. That needs to change and in order for that to happen, there needs to be free access to patterns for people to make and donate.

My goal is 10 Moses basket/Cradle patterns but who knows, I may get even more. A variety of styles and sizes is important too as well as variations on trim, so you can expect a heap of patterns and pieces to help make these beds as comfortable and sweet as possible.

Of course Ill also be adding patterns for other things in there as well. In fact I have a cowl, a 20week beanie and another rattle ready to go, I just need to finalise the patterns and double check for errors.

Ok so enough chatter and on to today's pattern! This cradle measures just over 30cm in length and should comfortably fit a baby up to 20weeks gestation. It is quite simple to make but does require you use 2 strands of yarn as one, this helps get the thickness required to keep the sides up. Read the pattern carefully, some rows are a mix of hdc and dc (this is to obtain width without extra length and make the oval more ovalish)

You will need:
5.00mm hook
4.5mm hook
2 balls of white DK weight (8ply for AUS/UK) yarn
1 ball of DK weight yarn in a contrasting colour.

For the base: If you choose to make it like mine (other options down the page)
Cardboard as large as the bed base
2 pieces of felt as large as the bed base
Glue (I used a hot glue gun, simply because it dries faster and I was using it to add the flowers anyway)
Sewing machine or a needle and thread to hand sew

Small flowers to decorate

Bed Base:
With your 5mm hook and 2 strands of white:


1: ch18, dc 3 times in the 3rd chain from hook, dc in the next 14 chains, 4dc in the end chain, DO NOT TURN, working round the corner, on the opposite side of the chain, dc in the next 14 stitches, join.

2: ch3, dc in the same stitch, 2dc in each of the next 3 stitches,  dc in the next 14 stitches, 2dc in the next 4 stitches, dc in the next 14, join

3: ch2, hdc in the same st, *hdc, 2hdc in the next stitch* 4 times (total of 12hdc) dc in the next 13 stitches, *2hdc in the next stitch, hdc* 4 times (12 hdc) dc in the next 14 stitches, join

4: ch2, *2hdc, hdc, hdc* 4 times (16hdc) dc in the next 14 stitches, *2hdc, hdc, hdc* 4 times (16hdc) dc in the next 14 stitches, join

5: ch2, *2dc, dc, dc, dc* 4 times (20dc) dc in the next 14 stitches, *2dc, dc, dc* 4 times (20dc) dc in the next 14 stitches, join

6: ch2, *2dc, dc, dc, dc, dc* 4 times (24dc) dc in the next 14 stitches, *2dc, dc, dc, dc, dc* 4 times (24dc) dc in the next 14 stitches, join

7: ch2, *2dc, dc, dc, dc, dc, dc* 4 times (28dc) dc in the next 14 stitches, *2dc, dc, dc, dc, dc, dc* 4 times (28dc) dc in the next 14 stitches, join

8: ch2, hdc in the BACK LOOPS ONLY of each stitch around, join

9-12: ch2, hdc in each stitch around, join.

13: ch2, hdc in the next 48, dc in the next 28 stitches, hdc in the remaining stitches, join

14: Repeat row 13. After joining, end off the white, and weave in ends.

TRIM: With contrasting colour and 4.5mm hook

1. Join contrasting colour to the back loop of any stitch from the last row. sc in the back loop only all the way around, join


2: sl st down into the FRONT loop (unused from the last round), *ch8, sk1, slst in the next* repeat around to make a loopy edge. Join.


3: sl st down into the bottom of the first loop from the previous row (I did 4slst to get there without bunching the loop *ch8, slst in the bottom of the ch8 loop from the previous row* Repeat around, join. End off and weave in ends.


The Base:

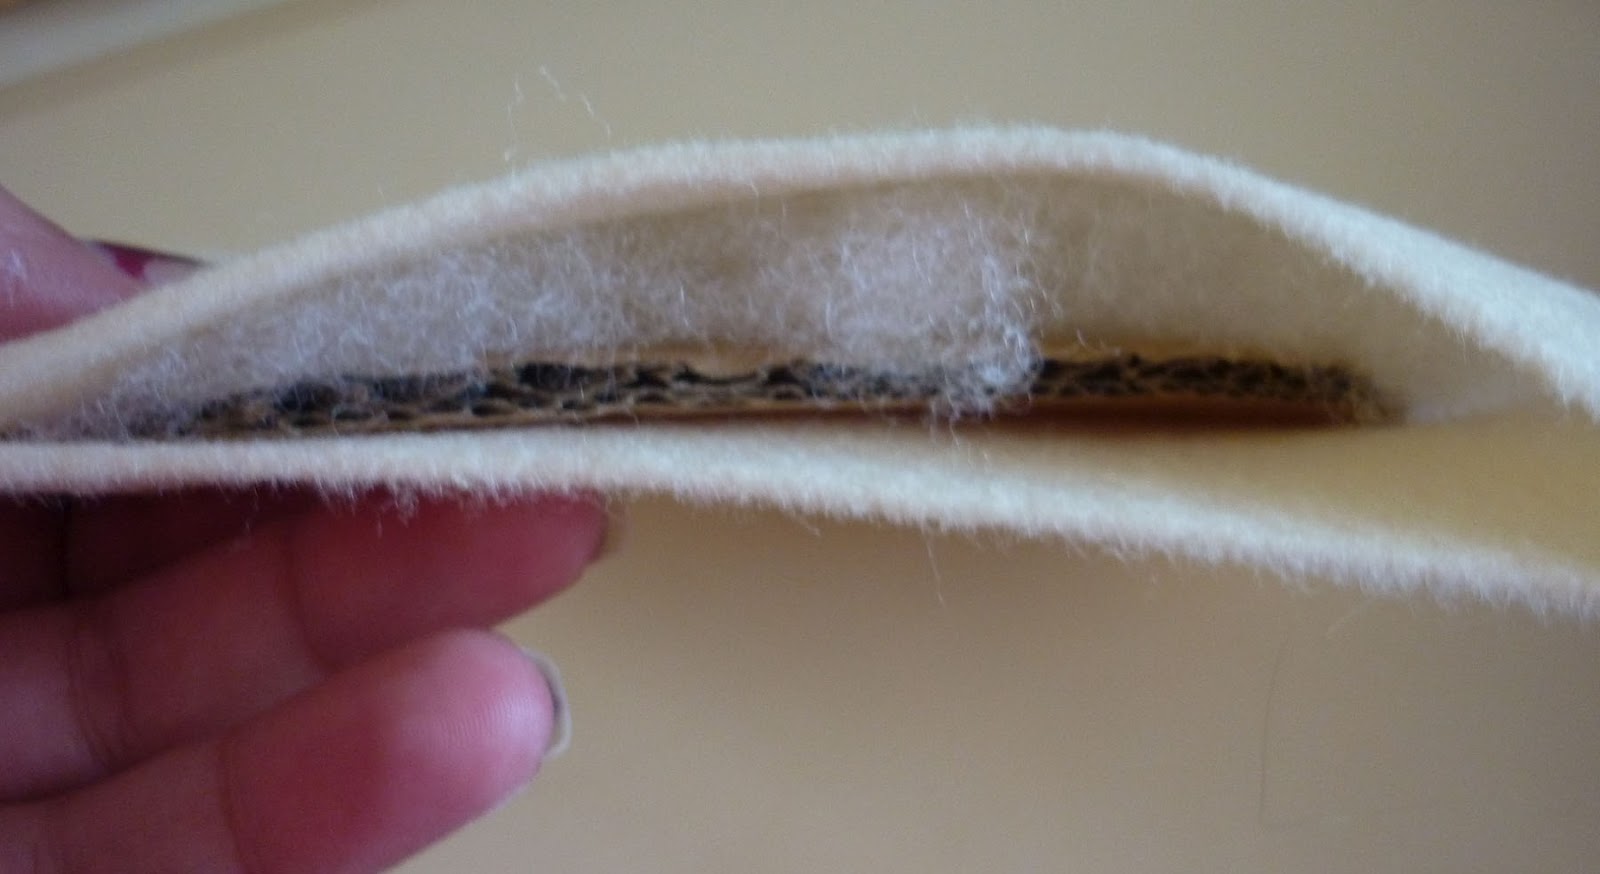
Honestly, there are a lot of ways you could make a base for these beds. I used what I had on hand and what I could source without breaking the budget. You COULD use: Thin foam (yoga mats/camp mats work well for this), a few layers of craft foam, a mattress sewn and stuffed, plastic mesh craft board or Im sure many number of other items. For me, I used Cardboard, felt and stuffing, as I always have that on hand. Here is how I did it.

1. Trace the base of the bed onto cardboard to get the size. Cut out the cardboard inside the line you drew. Double check it fits in the base of the bed, you want it snug, but not too snug that it wont fit once its covered.


2: Using glue (I hot glued, glue guns = fast work and quick drying) glue down a piece of felt that is larger then the cardboard base on one side of the cardboard.


3. Flip the cardboard over and spread out a layer of glue on the top side. Now working quickly before it dries stick down a thin layer of stuffing. Batting for quilts would work just as well but again, I didn't have any on hand.

4. Add some more glue to the top of the stuffing and press down a top layer of felt.


TADDA You have a felt/cardboard/stuffing/glue sandwich! Yes yes, its full of fibre *hardy har* Don't eat it!


5. Using the sewing machine (or you can hand stitch) sew around the edge of the bed. If you butt the cardboard up against the machine foot it will be close and you can follow the base around very easily.
Trim off any excess.


I decided at this point I needed to make it a bit neater, so I went back and did a zigzag around the end to seal it all. If you have a overlocker then use that. If you hand stitch, then a blanket stitch will achieve the same results.


Thats it! You have one mattress that is both soft and sturdy and will make a great base for the cradle.

Slide the base inside. While you have that gluegun out, hot glue on any decorations you wish to use. I spaced out some small fabric daisies around the edge.


Congrats, You now have a completed Moses Basket! It is a little time consuming, but definitely worth the effort!


Monday, September 10, 2012

Kiri Beanie - Free Crochet Pattern

Hello beautiful people. I have a new pattern for you all today. Actually I have a few, but I think Ill stagger them out a little so I don't overload anyone! Today I want to share the Kiri Beanie! It comes in 2 sizes, 30-32 weeks gestation  and 34-36 weeks gestation. Larger hats were recently requested by Chances Clothes Project and of course I am happy to help out. You all know I can't pass up an excuse to add in another pattern! Ok so onto the pattern!

You will need:
DK weight yarn in 2 colours, main, and a small amount of a contrasting colour
4mm hook for 34-36 weeks gestation
3mm hook for 30-32 weeks gestation
darning needle for ends

1. ch3, dc 10 times in the 1st chain
2. ch3, dc in the same stitch, 2dc in each st around
3. ch3, *dc in the next stitch, 2dc in the next stitch* repeat around
4. ch3, *dc, dc, 2dc in the next stitch* repeat around
5-7. ch3, dc in each st around
8. ch2, hdc around
join contrasting colour

9. ch2, *sk1, 5dc in the next, sk1, hdc in the next* Repeat around, the last repeat will be a stitch short, thats ok just join to the initial chain. end off colour

10. Join main colour in the middle stitch of a 5dc cluster. ch2, dc in the same stitch twice more, sk2, *hdc (in the hdc from the last row), sk2, 5dc in the next (center stitch of the next cluster), sk2* Repeat around, do 2 more dc in the same st you started with to complete the first cluster, join to the ch3, finish off.

End off and weave in all ends. Thats it! Its a very simple hat but with the right colours has a pretty neat effect. 


Sunday, September 2, 2012

Free Crochet Pattern - Birdy Rattle


A few weeks ago I made a fun dinosaur rattle, and while it looked great, it had a lot of parts and took forever to put together. I'm all for fast and easy so today I'm sharing a pattern for a bird rattle I worked up this afternoon, in the hopes of it being easier and quicker! I'm sure it would look a lot better with a felt beak and safety eyes but in the interest of safety and to avoid swallowing hazards I've just embroidered the faces on with yarn. Yes, you can sell items from this pattern, however in return I ask that perhaps you link back here, or add a pic to the Ravelry page. I just love seeing everyone's outcomes! This rattle is done in a continual round, so no joins YAY

Ok so supplies!
DK weight yarn in bird colour and handle colour as well as small amounts of black and orange for the face. I used Moda Vera Marvel from Spotlight
3.5mm hook
jingle bells if you wish for it to rattle
polyfil stuffing (or whatever you use to stuff things with)
stitch markers

Make the wings first. Make 2


1. ch2, 6sc in the 1st chain, place marker
2. sc in each st around
3-4. Repeat round 2
Squash flat and sc 3 times across the top to close, ch1 turn
sc 3, end off leaving long end to sew on.


Rattle

with main colour (in this case pink)

1. ch2, 6sc in 1st chain, place marker
2. 2sc in each st
3. sc in each st around
4. sc, 2sc in the next, repeat around
5. sc in each st around
6. sc, sc, 2sc in the next, repeat around
7 sc, sc, sc, 2sc in the next, repeat around

(add face and sew in wings around here)

8 - 12 sc in each st around
13. sc, sc, sc, sct2g, repeat around
14. sc in each st around
15. sc, sc, sc2tg, repeat around
16. sc, sc2tg repeat around

Stuff up to this point, and stuff the handle as you go.

join handle colour (brown) sc around until handle piece is 3 inches long

sc2tg around, finish off leaving a long tail, weave tail in and out of final stitches and pull tight. Finish off and weave in ends.