Good morning lovlies,
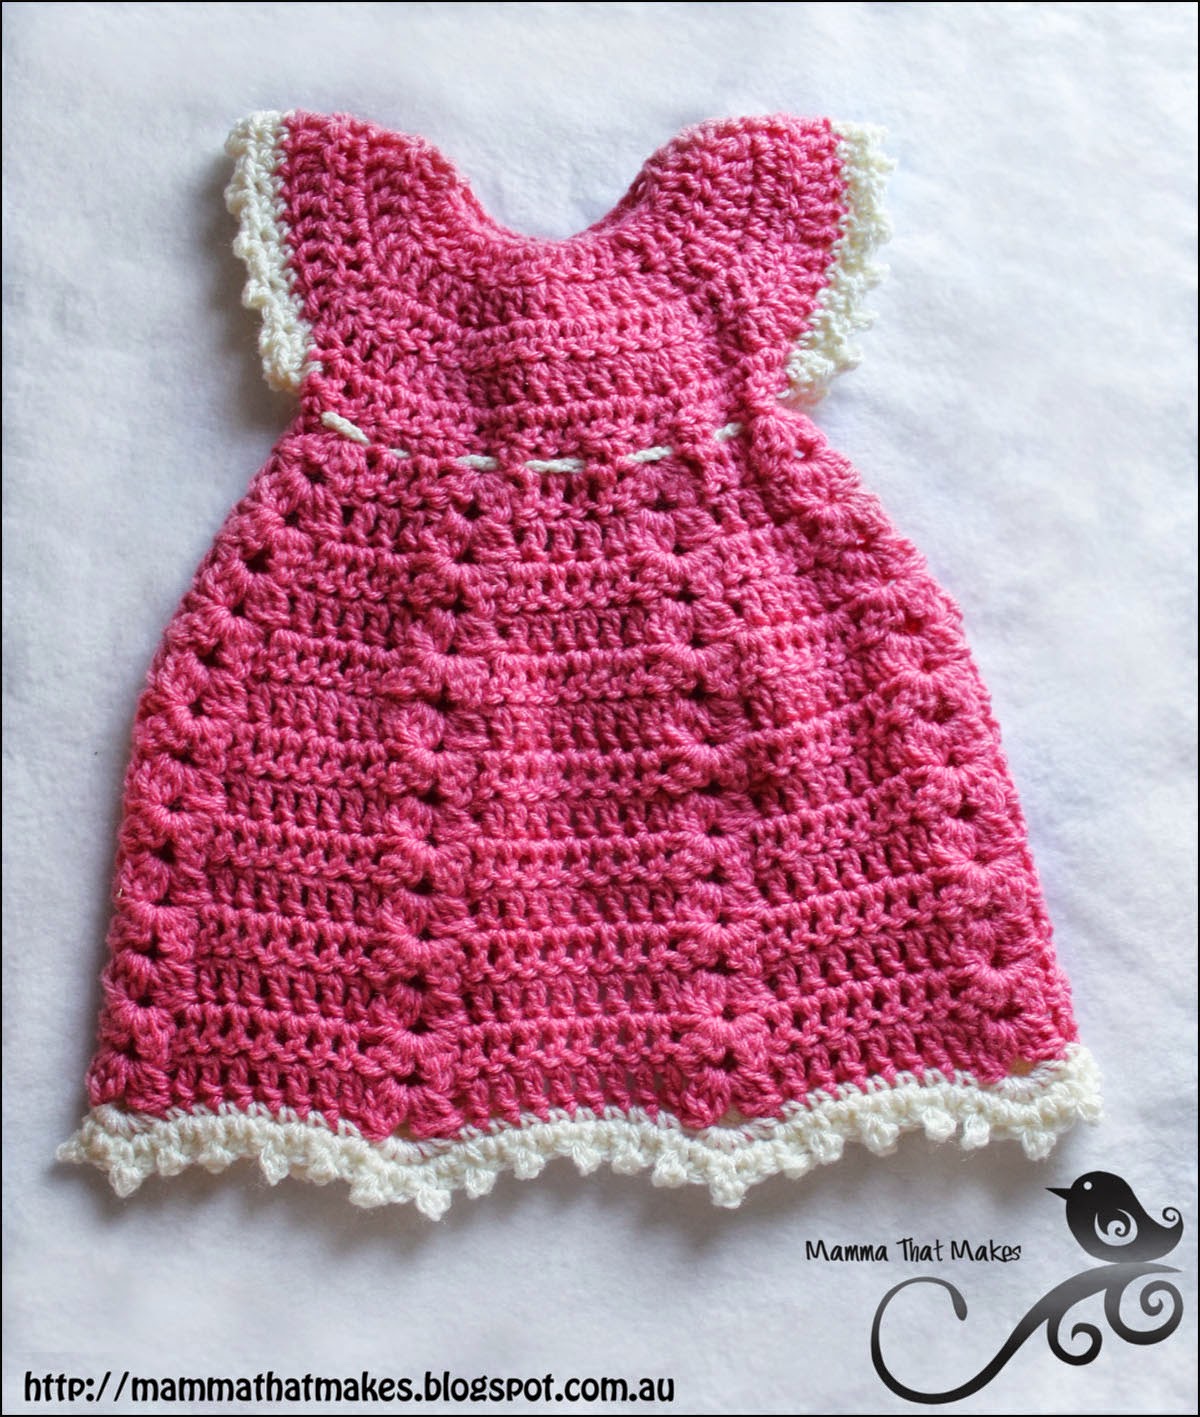
I am happy to share with you today this months preemie pattern. This one, I actually started last year and I picked it up and put it down again many times, trying to figure out where I wanted to go with it. I'm so glad it is finally done! Such a sweet and delicate little gown. The Sophia gown comes in 2 sizes, but I will be adding a third once I've had a chance to test it fully. If you want to make this in NEWBORN (full term) size then go with worsted weight yarn and a 5.5mm or 6mm hook and you should be right. I'll edit once I've finished mine but so far so good!
Now this one looks a little long winded but it is NOT complicated. I've wrote it out using less shorthand then I usually would, as I know a few beginners that would like to tackle this. If you are struggling to remember what section you are at, try printing the pattern and highlighting the parts as you do it. Once you see the repeats you should be fine.
Tłumaczenie polsko poniżej.
TO MAKE 32-34 WEEKS
4.5mm hook
DK weight yarn in main and contrasting colours.
TO MAKE 18-20 WEEKS
2.5mm hook
4ply (fingering or even sock) yarn in main and contrasting colours
The smaller dress with the stripes, colour changes happen on rows 5 and 10.
Optional: Button for closure
Special Stitches: 3dc cluster - yarn over, insert hook into stitch, pull yarn through (3 loops on hook), yarn over, pull through 2 loops (2 on hook), yarn over, insert hook into same stitch, pull yarn through (4 on hook), yarn over, pull through 2 loops (3 on hook), yarn over, insert hook into same stitch, pull yarn through (5 on hook), yarn over, pull through 2 loops (4 on hook), yarn over, pull through all stitches. Cluster made.
NOTE: No stitches are made in the top of the clusters, these are skipped on every row.
1: ch30, dc in the 3rd ch from hook, 2dc in the next ch, *dc in the next ch, 2dc in the next ch* Repeat across (42)
2: ch2, turn, *dc in the first 2 stitches, 2dc in the next stitch* Repeat across (56)
3: ch2, turn, *dc in the first 3 stitches, 2dc in the next stitch* Repeat across (70)
4: ch2, turn, *dc in the first 4 stitches, 2dc in the next stitch* Repeat across (84)
5: ch2, turn, dc in the first 11 stitches, skip the next 19 stitches, dc in the next 24 stitches, skip the next 19 stitches, dc in the last 11 stitches. (46)
6: ch1, turn, sc across (46)
7: ch2, turn, dc in the first 6 stitches, sk1, (cluster, ch2, cluster) in the next stitch, sk1, dc in the next 3 stitches, sk1, (cluster, ch2, cluster) in the next stitch, sk1, dc in the next 3 stitches, sk1, (cluster, ch2, cluster) in the next stitch, sk1, dc in the next 4 stitches, sk1, (cluster, ch2, cluster), sk1, dc in the next 3 stitches, sk1, (cluster, ch2, cluster) in the next stitch, sk1, dc in the next 3 stitches, sk1, (cluster, ch2, cluster), sk1, dc in the last 6 stitches. (28dc's, 6 sets of clusters)
8: ch2, turn, dc in the first 6 stitches, (cluster, ch2, cluster) in the ch2 space, dc 3, (cluster, ch2, cluster) in the next ch2 space, dc 3, (cluster, ch2, cluster) in the next ch2 space, dc 4, (cluster, ch2, cluster) in the next ch2 space, dc 3, (cluster, ch2, cluster) in the next ch2 space, dc 3, (cluster, ch2, cluster) in the next ch2 space, dc in the last 6 stitches. (28dc's, 6 sets of clusters)
9: ch2, turn, dc in the first 6 stitches, (cluster, ch2, cluster) in the next ch2 space, 2dc in the next stitch, dc in the next stitch, 2dc in the next stitch, (cluster, ch2, cluster) in the next ch2 space, 2dc in the next stitch, dc in the next stitch, 2dc in the next stitch, (cluster, ch2, cluster) in the next ch2 space, 2dc in the next stitch, dc in the next 2 stitches, 2dc in the next stitch, (cluster, ch2, cluster) in the next ch2 space, 2dc in the next stitch, dc in the next stitch, 2dc in the next stitch, (cluster, ch2, cluster) in the next ch2 space, 2dc in the next stitch, dc in the next stitch, 2dc in the next stitch, (cluster, ch2, cluster) in the next ch2 space, dc in the last 6 stitches. (38dc's 6 sets of clusters)
10: ch2, turn, dc in the first 6 stitches, (cluster, ch2, cluster) in the next ch2 space, dc 5, (cluster, ch2, cluster) in the next ch2 space, dc 5, (cluster, ch2, cluster) in the next ch2 space, dc 6, (cluster, ch2, cluster) in the next ch2 space, dc 5, (cluster, ch2, cluster) in the next ch2 space, dc 5, (cluster, ch2, cluster) in the next ch2 space, dc in the last 6 stitches. (38dc's 6 sets of clusters)
11: ch2, turn, dc in the first 6 stitches, (cluster, ch2, cluster) in the ch2 space, 2dc in the next stitch, dc in the next 3 stitches, 2dc in the next stitch, (cluster, ch2, cluster) in the ch2 space, 2dc in the next stitch, dc in the next 3 stitches, 2dc in the next stitch, (cluster, ch2, cluster) in the ch2 space, 2dc in the next stitch, dc in the next 4 stitches, 2dc in the next stitch, (cluster, ch2, cluster) in the ch2 space, 2dc in the next stitch, dc in the next 3 stitches, 2dc in the next stitch, (cluster, ch2, cluster) in the ch2 space, 2dc in the next stitch, dc in the next 3 stitches, 2dc in the next stitch, (cluster, ch2, cluster) in the ch2 space, dc in the last 6 stitches. (48dc's 6 sets of clusters)
12: ch2, turn, dc in the first 6 stitches, (cluster, ch2, cluster) in the ch2 space, dc 7, (cluster, ch2, cluster) in the ch2 space, dc 7, (cluster, ch2, cluster) in the ch 2 space, dc 7, (cluster, ch2, cluster) in the ch2 space, dc 8, (cluster, ch2, cluster) in the ch2 space, dc 7, (cluster, ch2, cluster) in the ch2 space, dc 7, (cluster, ch2, cluster) in the ch2 space, dc in the last 6 stitches. (48dc's 6 sets of clusters)
13-21: Repeat row 12
End off main colour and join contrasting
22: ch1, turn, sc in the first 6 stitches, 5sc in the ch2 gap, sc 7, 5sc in the ch2 gap, sc 7, 5sc in the ch2 gap, sc 8, 5sc in the ch2 gap, sc 7, 5sc in the ch2 gap, sc 7, 5sc in the ch2 gap, sc in the last 6 stitches. (74 sc's)
23: ch1, turn, *sc in the first stitch, (sc, picot) in the next stitch* repeat across. End off.
Sleeve Edging
1: Join contrasting yarn to any stitch in the armhole and ch1, sc evenly around the entire armhole for 24 stitches, join.
2: ch1, *sc in the first stitch, (sc, picot) in the next stitch* repeat round, join. End off.
Weave in all ends.
Closure options. You can use a button for closing. You can make chains for ties (purple/cream dress) and you can also make a longer chain that weaves in and out (I did this on round 6 of the pink dress) of stitches and ties at the back. You could also use ribbon.
Tłumaczenie polsko poniżej.
Sukieneczka Sophia
Materiały:
18-22 tygodnie ciąży:
32-34 tygodnie ciąży:
guziki opcjonalnie
Ściegi specjalne:
pęczek z trzech słupków - narzuć na szydełko, wsadź szydełko w oczko, i przeciągnij włóczkę (3 pętelki na szydełku), narzuć na szydełko, przeciągnij przez 2 pętelki (2 pętelki zostały na szydełku), narzuć na szydełko, wsadź szydełko w to samo oczko, przeciągnij włóczkę (4 pętelki na szydełku), narzuć na szydełko, przeciągnij przez 2 pętelki (3 pętelki na szydełku), narzuć na szydełko, wsadź szydełko w to samo oczko, przeciągnij włóczkę (5 pętelek na szydełku), narzuć na szydełko, przeciągnij przez 2 pętelki (4 pętelki na szydełku), narzuć na szydełko, przeciągnij przez wszystkie pętelki z szydełka. Pęczek gotowy :)
Uwaga:
Rząd 1: 30 oczek łańcuszka, 1x słupek w trzecim oczku od szydełka, 2x słupek w następnym oczku, *1x słupek w następnym oczku, 2x słupek w następnym oczku* Powtarzać do końca (42)
Rząd 2: 2 oczka łańcuszka na odwrócenie rzędu, odwrócić, *1x słupek w pierwszych 2 , 2x słupek w następnym* Powtarzać do końca (56)
Rząd 3: 2 oczka łańcuszka, odwrócić, *1x słupek w pierwszych 3, 2x słupek w następnym* Powtarzać do końca (70)
Rząd 4: 2 oczka łańcuszka, odwrócić, *1x słupek w pierwszych 4, 2x słupek w następnym* Powtarzać do końca (84)
Rząd 5: 2 oczka łańcuszka, odwrócić, 1x słupek w 11 oczkach, opuść następne 19 oczek, 1x słupek w następnych 24 oczkach, opuść następne 19 oczek, 1x słupek w ostatnich 11 oczkach. (46)
Rząd 6: 1 oczko łańcuszka, odwrócić, półsłupki do końca (46)
Rząd 7: 2 oczka łańcuszka, 1x słupek w pierwszych 6 oczkach, opuść 1 oczko, (pęczek, 2 oczka łańcuszka, pęczek) w następnym oczku, opuść 1 oczko, 1x słupek w następnych 3 oczkach, opuść 1 oczko, (pęczek, 2 oczka łańcuszka, pęczek) w następnym oczku, opuść 1 oczko, 1x słupek w następnych 3 oczkach, opuść 1 oczko, (pęczek, 2 oczka łańcuszka, pęczek) w następnym oczku, opuść 1 oczko, 1x słupek w następnych 4 oczkach, opuść 1 oczko, (pęczek, 2 oczka łańcuszka, pęczek) w następnym oczku, opuść 1 oczko, 1x słupek w następnych 3 oczkach, opuść 1 oczko, (pęczek, 2 oczka łańcuszka, pęczek) w następnym oczku, opuść 1 oczko, 1x słupek w następnych 3 oczkach, opuść 1 oczko, (pęczek, 2 oczka łańcuszka, pęczek) w następnym oczku, opuść 1 oczko, 1x słupek w ostatnich 6 oczkach. (28 słupków, 6 grup pęczków)
Rząd 8: 2 oczka łańcuszka, odwrócić, 1x słupek w pierwszych 6 oczkach, (pęczek, 2 oczka łańcuszka, pęczek) w przerwie utworzonej z 2 oczek łańcuszka, 1x słupek w następnych 3 oczkach, (pęczek, 2 oczka łańcuszka, pęczek) w przerwie utworzonej z 2 oczek łańcuszka, 1x słupek w następnych 3 oczkach, (pęczek, 2 oczka łańcuszka, pęczek) w przerwie utworzonej z 2 oczek łańcuszka, 1x słupek w następnych 4 oczkach, (pęczek, 2 oczka łańcuszka, pęczek) w przerwie utworzonej z 2 oczek łańcuszka, 1x słupek w następnych 3 oczkach, (pęczek, 2 oczka łańcuszka, pęczek) w przerwie utworzonej z 2 oczek łańcuszka, 1x słupek w następnych 3 oczkach, (pęczek, 2 oczka łańcuszka, pęczek) w przerwie utworzonej z 2 oczek łańcuszka, 1x słupek w ostatnich 6 oczkach. (28 słupków, 6 grup pęczków)
Rząd 9: 2 oczka łańcuszka,odwrócić, 1x słupek w pierwszych 6 oczkach, (pęczek, 2 oczka łańcuszka, pęczek) w przerwie utworzonej z 2 oczek łańcuszka, 2x słupek w następnym oczku, 1x słupek w następnym oczku, 2x słupek w następnym oczku, (pęczek, 2 oczka łańcuszka, pęczek) w przerwie utworzonej z 2 oczek łańcuszka, 2x słupek w następnym oczku, 1x słupek w następnym oczku, 2x słupek w następnym oczku, (pęczek, 2 oczka łańcuszka, pęczek) w przerwie utworzonej z 2 oczek łańcuszka, 2x słupek w następnym oczku, 1x słupek w następnych 2 oczkach, 2x słupek w następnym oczku, (pęczek, 2 oczka łańcuszka, pęczek) w przerwie utworzonej z 2 oczek łańcuszka, 2x słupek w następnym oczku, 1x słupek w następnym oczku, 2x słupek w następnym oczku, (pęczek, 2 oczka łańcuszka, pęczek) w przerwie utworzonej z 2 oczek łańcuszka, 2x słupek w następnym oczku, 1x słupek w następnym oczku, 2x słupek w następnym oczku, (pęczek, 2 oczka łańcuszka, pęczek) w przerwie utworzonej z 2 oczek łańcuszka, 1x słupek w ostatnich 6 oczkach. (38 słupków, 6 grup pęczków)
Rząd 10: 2 oczka łańcuszka, odwrócić, 1x słupek w pierwszych 6 oczkach, (pęczek, 2 oczka łańcuszka, pęczek) w przerwie utworzonej z 2 oczek łańcuszka, 1x słupek w 5 następnych oczkach, (pęczek, 2 oczka łańcuszka, pęczek) w przerwie utworzonej z 2 oczek łańcuszka, 1x słupek w 5 następnych oczkach, (pęczek, 2 oczka łańcuszka, pęczek) w przerwie utworzonej z 2 oczek łańcuszka, 1x słupek w 6 następnych oczkach, (pęczek, 2 oczka łańcuszka, pęczek) w przerwie utworzonej z 2 oczek łańcuszka, 1x słupek w 5 następnych oczkach, (pęczek, 2 oczka łańcuszka, pęczek) w przerwie utworzonej z 2 oczek łańcuszka, 1x słupek w 5 następnych oczkach, (pęczek, 2 oczka łańcuszka, pęczek) w przerwie utworzonej z 2 oczek łańcuszka, 1x słupek w ostatnich 6 oczkach. (38 słupków, 6 grup pęczków)
Rząd 11: 2 oczka łańcuszka, odwrócić, 1x słupek w pierwszych 6 oczkach, (pęczek, 2 oczka łańcuszka, pęczek) w przerwie utworzonej z 2 oczek łańcuszka, 2x słupek w następnym oczku, 1x słupek w następnych 3 oczkach, 2x słupek w następnym oczku, (pęczek, 2 oczka łańcuszka, pęczek) w przerwie utworzonej z 2 oczek łańcuszka, 2x słupek w następnym oczku, 1x słupek w następnych 3 oczkach, 2x słupek w następnym oczku, (pęczek, 2 oczka łańcuszka, pęczek) w przerwie utworzonej z 2 oczek łańcuszka, 2x słupek w następnym oczku, 1x słupek w następnych 4 oczkach, 2x słupek w następnym oczku, (pęczek, 2 oczka łańcuszka, pęczek) w przerwie utworzonej z 2 oczek łańcuszka, 2x słupek w następnym oczku, 1x słupek w następnych 3 oczkach, 2x słupek w następnym oczku, (pęczek, 2 oczka łańcuszka, pęczek) w przerwie utworzonej z 2 oczek łańcuszka, 2x słupek w następnym oczku, 1x słupek w następnych 3 oczkach, 2x słupek w następnym oczku, (pęczek, 2 oczka łańcuszka, pęczek) w przerwie utworzonej z 2 oczek łańcuszka, 1x słupek w ostatnich 6 oczkach. (48 słupków, 6 grup pęczków)
Rząd 12: 2 oczka łańcuszka, odwrócić, 1x słupek w pierwszych 6 oczkach, (pęczek, 2 oczka łańcuszka, pęczek) w przerwie utworzonej z 2 oczek łańcuszka, 1x słupek w 7 następnych oczkach, (pęczek, 2 oczka łańcuszka, pęczek) w przerwie utworzonej z 2 oczek łańcuszka, 1x słupek w 7 następnych oczkach, (pęczek, 2 oczka łańcuszka, pęczek) w przerwie utworzonej z 2 oczek łańcuszka, 1x słupek w 8 następnych oczkach, (pęczek, 2 oczka łańcuszka, pęczek) w przerwie utworzonej z 2 oczek łańcuszka, 1x słupek w 7 następnych oczkach, (pęczek, 2 oczka łańcuszka, pęczek) w przerwie utworzonej z 2 oczek łańcuszka, 1x słupek w 7 następnych oczkach, (pęczek, 2 oczka łańcuszka, pęczek) w przerwie utworzonej z 2 oczek łańcuszka, 1x słupek w ostatnich 6 oczkach. (48 słupków, 6 grup pęczków)
Rzędy13-21: Powtarzać rząd 12
Zakończ kolor główny i dołącz kontrastujący.
Rząd 22: 1 oczko łańcuszka, odwrócić, 1x półsłupek w pierwszych 6 oczkach, 5x półsłupek w przerwie utworzonej z 2 oczek łańcuszka, 1x półsłupek w kolejnych 7 oczkach, 5x półsłupek w przerwie utworzonej z 2 oczek łańcuszka, 1x półsłupek w kolejnych 7 oczkach, 5x półsłupek w przerwie utworzonej z 2 oczek łańcuszka, 1x półsłupek w kolejnych 8 oczkach, 5x półsłupek w przerwie utworzonej z 2 oczek łańcuszka, 1x półsłupek w kolejnych 7 oczkach, 5x półsłupek w przerwie utworzonej z 2 oczek łańcuszka, 1x półsłupek w kolejnych 7 oczkach, 5x półsłupek w przerwie utworzonej z 2 oczek łańcuszka, 1x półsłupek w ostatnich oczkach. (74 półsłupków)
Rząd 23: 1 oczko łańcuszka, odwrócić, *1x półsłupek, (półsłupek, pikotek) w kolejnym oczku* powtarzać do końca. Zakończyć.
Zakończenie rękawków
Rząd 1: Dołącz włóczkę w kontrastującym kolorze do dowolnego oczka. 1 oczko łańcuszka, półsłupek równomiernie dookoła całego rękawka do uzyskania 24 półsłupków, połącz.
Rząd 2: 1 oczko łańcuszka, *1x półsłupek, (półsłupek, pikotek) w kolejnym oczku* powtarzaj dookoła, połącz. Zakończ.
Opcje zapięcia:
Możesz użyć guziczkow. Możesz zrobić sznureczek z łańcuszków do zawiązania (purpurowo/kremowa sukieneczka)
Możesz również zrobić dłuższy sznureczek, przeciągnąć go pomiędzy oczkami i zawiązać z tyłu. (Zrobiłam tak w 6 rzędzie różowej sukienki)
Możesz również użyć wstążeczki.