Sunday, March 30, 2014

SSEDK Beanie Variations

Good afternoon all.

Today I just wanted to start my collection of variations for Shell's Super Easy DK Earflap Beanie. I will be adding them all to the one post here so you can easily find them and not have to load multiple pages. You can also find the details on Ravelry. This will be updated whenever a new variation is added so remember to check back regularly.


Tweet Tweet Variation


Make hat as instructed on the SSEDK page.
To make the beak with a 4.5mm hook:
ch4, join to make a loop. Into the loop (ch2, 6dc, 1trc, ch2, 1trc, 6dc, ch2, sl st back into the loop)
End off leaving a long tail.
Attach beak to hat.
Add 2 buttons for eyes. (or ch2, hdc into the 1st ch 9 times, join and leave a long tail for sewing)
Cut 10 7inch strands of yarn, and attach to the top of the hat like you would adding a braid. Trim to desired length. 


Bunny Variation


Make hat as instructed on the SSEDK page.
With 3.5mm hook
Cream yarn
pink yarn

Outer Ear
With cream:

1: ch20, hdc in the 2nd ch from hook, hdc in the next 17 chs, hdc 5 times in the end chain, do not turn, working on opposite side hdc in the next 18 chs
2: ch2, hdc 18, 2hdc in each of the next 5 stitches, hdc in the last 18 stitches
3: ch2, turn, hdc 18, 2hdc in each of the next 10 stitches, hdc in the last 18 stitches
End off leaving a long tail

Inner Ear
With Pink:
1: ch18, hdc in the 2nd ch from hook, hdc in the next 15 chs, hdc 5 times in the end chain, do not turn, working on opposite side hdc in the next 16 chs
2: ch2, turn, hdc in the first 16 stitches, 2hdc in each of the next 5 stitches, hdc in the last 16 stitches.
End off leaving long tail.

Attach inner ear to outer ear, when i do this I use the pink tail, and be very careful to only sew through the top of the cream ear piece so the pink does not show on the back. 
Position your ears on top of the hat and sew into place. 


Bear


Ears with 5.5 and main colour (make 2)
1: ch2, hdc 8 times in the 2nd ch from hook, join.
2: ch2, 2hdc in each stitch around, join
3-6: ch2, hdc in each stitch around, join
End off leaving long tail.
Squeeze flat and sew to head.

Muzzle
With chenille (in white) and a 4.5mm hook
1: ch2, hdc 8 times in the 2nd st from hook, join.
2: ch2, 2hdc in each st around, join
3: ch2, *2hdc in the first st, hdc in the next st* repeat around, join.
End off leaving long tail.

Nose
With black and 4.5mm hook
ch2, hdc 10 times into the 2nd ch from hook, join. 
End off leaving long tail.

Attach nose to the centre of the muzzle, using the tail backstitch a mouth onto the muzzle.
Attach the muzzle to the beanie
Sew on 2 buttons for eyes.

Fighting Turtle

Main colour: Green
Contrasting colour: Red, Orange, Blue or Purple
White and Black for eyes

0-3
R1-8 in green (end with hdc, hdc, sc, sc) end green
9-10 join contrasting to sc - (end last row with hdc, sc, slst.) end contrasting
Join main to 4sts to the left of last red sl st 
complete earflaps as instructed. 

3-6
R1-8 in green (end with hdc, hdc, sc, sc) end green
9-10 join contrasting to sc - (end last row with hdc, sc, slst.) end contrasting
Join main to 4sts to the left of last red sl st 
complete earflaps as instructed. 


6-12
R1-9 in green (end with hdc, hdc, sc, sc) end green
10-11 join contrasting to sc - (end last row with hdc, sc, slst.) end contrasting
Join main to 4sts to the left of last red sl st 
complete earflaps as instructed. 


Toddler
R1-11 in green (end with hdc, hdc, sc, sc) end green
12-13 join contrasting to sc - (end last row with hdc, sc, slst.) end contrasting
Join main to 4sts to the left of last red sl st 
complete earflaps as instructed. 


Child
R1-11 in green (end with hdc, hdc, sc, sc) end green
12-13 join contrasting to sc - (end last row with hdc, sc, slst.) end contrasting
Join main to 4sts to the left of last red sl st 
complete earflaps as instructed. 

Eyes (make 2)
ch2, into the first ch do the following stitches (2sc, 2hdc, 3dc, 1trc, 3dc, 2hdc, 2sc) join.
End off leaving love tail for sewing to hat.
Attach black button to the eye piece over the small gap. 


Friday, March 28, 2014

Lewis Jacket - Free crochet pattern


Good afternoon all

It has been a crazy few weeks here in the Mamma household. One that has led to some very tough choices and decisions being made.
Yesterday I announced that I would no longer be selling finished products. For a year now, I have been making and selling photography props and hats. Mainly to help cover the cost of postage for all the preemie items.

This meant I had less and less time to spend actually designing which is what I love to do the most.

So it is a little sad that I wont be running the store anymore, and I really do enjoy making props, but first and foremost is the designing aspect, being able to supply you all with patterns that I know will help families across the globe is more humbling and means much more to me then any amount of sales ever will. I have also been asked a LOT lately for larger sized patterns, and that is again, certainly something I want to play with. I want to remind everyone once again that I am more then happy to take requests for patterns! Just send me an email or leave a comment below and I'll see what I can do.

The Facebook pages will go back to how they originally were, so you can find all pattern and release info at MammaThatMakes on Facebook.

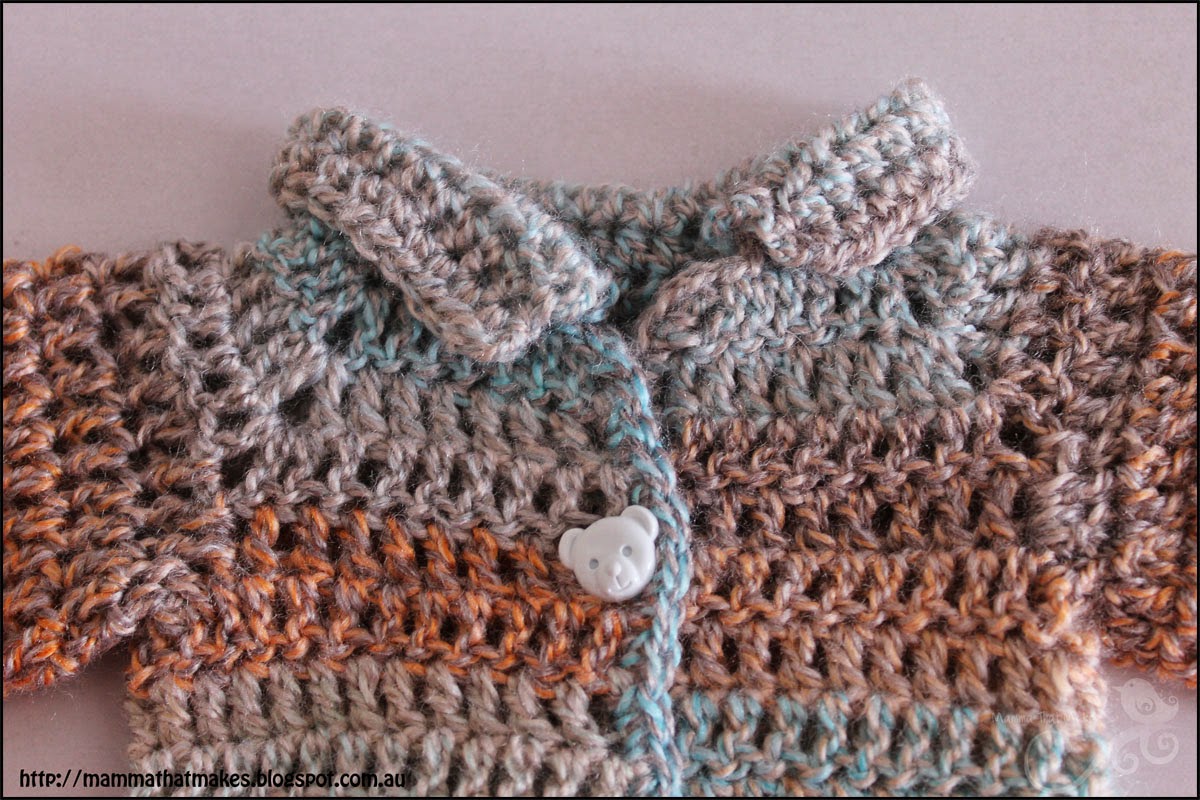
Anyhows! Today's pattern is for a little jacket that will fit 24-26 weeks gestation. It would work for both genders, but I used the blue/orange/brown variegated from Patons Fantasia range, which by the way, feels amazing! Its very simple to make and quite easy to adjust. I am making a second one, with stripes :)


3.75mm hook
4ply (fingering weight) yarn. I used Patons Fantasia.
2-3 buttons


1: ch40, dc in the 3rd ch from hook, dc in the next 5 chs, (dc, ch1, dc) in the next ch, dc in the next 5 chs, (dc, ch1, dc) in the next ch, dc in the next 12 chs, (dc, ch1, dc) in the next ch, dc in the next 5 chs, (dc, ch1, dc) in the next ch, dc in the last 6 chs.


2: ch2, turn, dc in the first 7 sts, (dc, ch1, dc) in the ch1 space, dc in the next 7 sts, (dc, ch1, dc) in the ch1 space, dc in the next 14 sts, (dc, ch1, dc) in the next ch1 gap, dc in the next 7 sts, (dc, ch1, dc) in the next ch1 space, dc in the last 7 sts.


3: ch2, turn, dc in the first 8 sts, (dc, ch1, dc) in the ch1 space, dc in the next 9 sts, (dc, ch1, dc) in the ch1 space, dc in the next 16 sts, (dc, ch1, dc) in the ch1 space, dc in the next 9 sts, (dc, ch1, dc) in the ch1 space, dc in the last 8 sts.


4: ch2, turn, dc in the first 9 sts, dc in the ch1 space, ch3, sk all dc’s to the next ch1 space and dc in that, dc in the next 18 sts, dc in the ch1 space, ch3, sk the next lot of dc’s and dc in the next ch1 space, dc in the last 9 sts.


5: ch2, turn, dc in the first 10 sts, dc 4 times in the ch3 space, dc in the next 20 sts, dc 4 times in the next ch3 space, dc in the last 10 sts.


6-11: ch2, turn, dc in each st across.


12: ch1, turn, sc across the all sts, in the very last st do 2sc, sc evenly up the side of the jacket, sc once in the top corner of the jacket, sl st in the next 2 sts (will be row1) ch2, hdc in the same st and in the next 33 sts (you should have 2 unworked sts left), ch2, turn, hdc back across all 34 hdcs, ch2, turn, hdc again along all 34 hdc’s, sl st down the side of the collar, sl st in the unworked sts and sc once in the corner, sc evenly down the side and 2sc into the last corner, sl st to join.


Fold down collar.


Sleeves
1: Join yarn to any st on the sleeve hole and ch2, dc evenly around (21sts for me), join.
2-8: ch2, dc around, join
9-10: ch1, sc in each st around, join.
End off yarn.


Repeat for second sleeve.

Attach buttons as desired


Monday, March 24, 2014

Shell's Super Easy DK Earflap Beanie


Hello everyone,

First let me apologise for missing Friday's prem pattern. Its been one of them weeks here unfortunately, and I just did not get it up. I'll have one Wednesday to make up for it :)

I do however have a huge release for today!
If you live in Aus like I do, you'll know that our "standard" weight of yarn is DK, 8ply. This is quite a bit thinner then America's standard Worsted weight 10ply and often it can be hard to follow along patterns and be assured the sizing is right.

Last month I decided I had had enough of always having to check every hat pattern I used for its sizing (particularly the popular character hats), so I sat down and wrote up a pattern for a basic DK weight dc earflap beanie, from newborn to child sizes. To make it even better, it is done in continual rounds! The sizes were tested by grabbing whatever child happened to be nearby at the time and getting them to try the beanies on. Of course by whatever child happened to be nearby I do indeed mean family and friends, and not some random child on the streets....

This beanie is quick, it is easy, and it is incredibly versatile. In fact, I plan on having a few variations up over the coming weeks to show you just how versatile it really is. It is now the ONLY earflap beanie pattern I use, and it is so easy to remember. Well, enough chatter, here it is!


All hats are made in continual rounds, the first round will have a very small gap that can be closed when weaving in the tail.


5mm hook


DK weight yarn


Stitch marker


Remember to move your marker at the end of each row so you know where you are up to.


Gauge: 7dc’s, 3 rows = 2x2inches (5x5cm)


0-3 Months


1: ch2, dc 8 times in the first chain, place marker (8)


2: 2dc in each stitch around (16)


3: *2dc in the first stitch, dc in the next stitch* repeat around (24)


4: *2dc in the first stitch, dc in the next 2 stitches* repeat around (32)


5: *2dc in the first stitch, dc in the next 3 stitches* repeat around (40)


6-10: dc in each stitch around


11: dc in the next stitch, hdc in the next 2 stitches, sc in the next 2 stitches, sl st in the next 4 stitches, ch2 and hdc in the same st as the last slst, hdc in the next 7 stitches (8)


12: ch1, turn, hdc in each stitch across (8)


13: ch1, turn, hdc2tg, hdc in the next 4 stitches, hdc2tg (6)


14: ch1, turn, hdc2tg, hdc in the next 2 stitches, hdc2tg (4)


15: ch1, turn, hdc2tg twice. (2)


Finish off and weave in ends.


With hat upside down, count 16 stitches to the LEFT of the earflap.


17: Join your yarn in the 16th stitch, ch2, hdc in the same stitch, hdc in the next 7 stitches (8)


18: ch1, turn, hdc in each stitch across (8)


3-6 Months


1: ch2, dc 9 times in the first chain, place marker (9)


2: 2dc in each stitch around (18)


3: *2dc in the first stitch, dc in the next stitch* repeat around (27)


4: *2dc in the first stitch, dc in the next 2 stitches* repeat around (36)


5: *2dc in the first stitch, dc in the next 3 stitches* repeat around (45)


6-10: dc in each stitch around


11: dc in the next stitch, hdc in the next 2 stitches, sc in the next 2 stitches, sl st in the next 4 stitches, ch2 and hdc in the same st as the last slst, hdc in the next 7 stitches (8)


12: ch1, turn, hdc in each stitch across (8)


13: ch1, turn, hdc2tg, hdc in the next 4 stitches, hdc2tg (6)


14: ch1, turn, hdc2tg, hdc in the next 2 stitches, hdc2tg (4)


15: ch1, turn, hdc2tg twice. (2)


Finish off and weave in ends.


With hat upside down, count 18 stitches to the LEFT of the earflap.


17: Join your yarn in the 18th stitch, ch2, hdc in the same stitch, hdc in the next 7 stitches (8)


18: ch1, turn, hdc in each stitch across (8)


6-12 Months


1: ch2, dc 8 times in the first chain, place marker (8)


2: 2dc in each stitch around (16)


3: *2dc in the first stitch, dc in the next stitch* repeat around (24)


4: *2dc in the first stitch, dc in the next 2 stitches* repeat around (32)


5: *2dc in the first stitch, dc in the next 3 stitches* repeat around (40)


6: *2dc in the first stitch, dc in the next 4 stitches* repeat around (48)


7-11: dc in each stitch around


12: dc in the next stitch, hdc in the next 2 stitches, sc in the next 2 stitches, sl st in the next 4 stitches, ch2 and hdc in the same st as the last slst, hdc in the next 7 stitches (8)


13: ch1, turn, hdc in each stitch across (8)


14: ch1, turn, hdc2tg, hdc in the next 4 stitches, hdc2tg (6)


15: ch1, turn, hdc2tg, hdc in the next 2 stitches, hdc2tg (4)


16: ch1, turn, hdc2tg twice. (2)


Finish off and weave in ends.


With hat upside down, count 20 stitches to the LEFT of the earflap.


17: Join your yarn in the 20th stitch, ch2, hdc in the same stitch, hdc in the next 7 stitches (8)


18: ch1, turn, hdc in each stitch across (8)


19: ch1, turn, hdc2tg, hdc in the next 4 stitches, hdc2tg (6)


20: ch1, turn, hdc2tg, hdc in the next 2 stitches, hdc2tg (4)


21: ch1, turn, hdc2tg twice. (2)


Do not end off.


22: hdc evenly around entire hat. Finish off and weave in all ends.


Toddler - 1-3 Years


1: ch2, dc 8 times in the first chain, place marker (8)


2: 2dc in each stitch around (16)


3: *2dc in the first stitch, dc in the next stitch* repeat around (24)


4: *2dc in the first stitch, dc in the next 2 stitches* repeat around (32)


5: *2dc in the first stitch, dc in the next 3 stitches* repeat around (40)


6: *2dc in the first stitch, dc in the next 4 stitches* repeat around (48)


7: *2dc in the first stitch, dc in the next 5 stitches* repeat around (56)


8-13: dc in each stitch around


14: dc in the next stitch, hdc in the next 2 stitches, sc in the next 2 stitches, sl st in the next 4 stitches, ch2 and hdc in the same st as the last slst, hdc in the next 7 stitches (8)


15: ch1, turn, hdc in each stitch across (8)


16: ch1, turn, hdc2tg, hdc in the next 4 stitches, hdc2tg (6)


17: ch1, turn, hdc2tg, hdc in the next 2 stitches, hdc2tg (4)


18: ch1, turn, hdc2tg twice. (2)


Finish off and weave in ends.


With hat upside down, count 25 stitches to the LEFT of the earflap.


19: Join your yarn in the 25th stitch, ch2, hdc in the same stitch, hdc in the next 7 stitches (8)


20: ch1, turn, hdc in each stitch across (8)


21: ch1, turn, hdc2tg, hdc in the next 4 stitches, hdc2tg (6)


22: ch1, turn, hdc2tg, hdc in the next 2 stitches, hdc2tg (4)


23: ch1, turn, hdc2tg twice. (2)


Do not end off.


24: hdc evenly around entire hat. Finish off and weave in all ends.


Child 4-12 Years


1: ch2, dc 9 times in the first chain, place marker (9)


2: 2dc in each stitch around (18)


3: *2dc in the first stitch, dc in the next stitch* repeat around (27)


4: *2dc in the first stitch, dc in the next 2 stitches* repeat around (36)


5: *2dc in the first stitch, dc in the next 3 stitches* repeat around (45)


6: *2dc in the first stitch, dc in the next 4 stitches* repeat around (54)


7: *2dc in the first stitch, dc in the next 5 stitches* repeat around (63)


8-13: dc in each stitch around


14: dc in the next stitch, hdc in the next 2 stitches, sc in the next 2 stitches, sl st in the next 4 stitches, ch2 and hdc in the same st as the last slst, hdc in the next 7 stitches (8)


15: ch1, turn, hdc in each stitch across (8)


16: ch1, turn, hdc2tg, hdc in the next 4 stitches, hdc2tg (6)


17: ch1, turn, hdc2tg, hdc in the next 2 stitches, hdc2tg (4)


18: ch1, turn, hdc2tg twice. (2)


Finish off and weave in ends.


With hat upside down, count 30 stitches to the LEFT of the earflap.


19: Join your yarn in the 30th stitch, ch2, hdc in the same stitch, hdc in the next 7 stitches (8)


20: ch1, turn, hdc in each stitch across (8)


21: ch1, turn, hdc2tg, hdc in the next 4 stitches, hdc2tg (6)


22: ch1, turn, hdc2tg, hdc in the next 2 stitches, hdc2tg (4)


23: ch1, turn, hdc2tg twice. (2)


Do not end off.

24: hdc evenly around entire hat. Finish off and weave in all ends.


Friday, March 14, 2014

Melanie Thread Gown


Good morning!

Today's pattern is for a small and delicate thread gown. This gown will fit roughly 18-20 weeks gestation, and is approx 9.5cm wide at chest (row under sleeves) 21.5cm long from centre neckline to bottom hem. It is really quick and easy to make too which is always a plus.
I am so happy with how the outfits have been coming along this year and I hope everyone has been enjoying them. As always, don't forget to check out my Ravelry Page and share some photos of your finished items with me.


Supplies
3.5mm, 4.5mm
size10 thread (might possibly beable to substitute for 2 or 3 ply yarn)
2 small buttons for back.

1: ch24, dc in the 3rd chain from hook, 2dc in the next chain, *dc in the next chain, 2dc in the next chain* repeat across

2: ch3, turn, *dc in the first 2 stitches, 2dc in the next stitch* repeat across.

3: ch3, turn, *dc in the first 3 stitches, 2dc in the next stitch* repeat across

4: ch3, turn, dc in the first stitch, dc in the next 7 stitches, ch2, skip 12, dc in the next 15 stitches, ch2, skip 12, dc in the last 8 stitches.

change to a 4.5mm hook

5: ch3, turn, dc in each stitch AND chain across

6: ch3, turn, *dc in the next stitch, 2dc in the next stitch* repeat across – 48

7: ch3, turn, skip the first st, dc in the next, *(dc, ch1, dc) in the next stitch, skip 1, dc in the next stitch, skip 1* repeat across ending with a dc in the turning chain

8: ch3, turn, *skip 1 st and (dc, ch1, dc) in the next ch1 space, skip 1, fpdc around the next dc* repeat across ending with a dc in the turning chain

9: ch3, turn, *skip 1 st and (dc, ch1, dc) in the next ch1 space, skip 1, bpdc around the next fpdc* repeat across ending with a dc in the turning chain

10-19: Repeat rows 8-9 5 times

20: Repeat row 8 one more time

21: ch1, turn, *dc 5 times in the next ch1 space, bpsc around the next fpdc* Repeat across.

Finish off and weave in loose ends.

Friday, March 7, 2014

Small Mitred Blanket


Good morning lovlies.
Today's pattern is for a little blanket. Done to the instructions you should get a blanket that is 30x30cm, which is the right size for a 14-16 week bub. To make it larger just continue following the increases. This is a pretty basic pattern, and nothing new in the big wide world of crochet, it is also a simple enough one that you can take with you or make while watching tv. 


Small Mitred Blanket

30x30cm square

5.5mm hook and 3 colours of dk weight yarn

For the sake of this pattern, colour A is white, colour B is green and colour C is pink.

With colour A

1: ch4, join to form a loop.

2: ch3, dc twice into the loop, *ch2, dc 3 times in the loop* repeat twice more, ch2, join to the top of the ch3, end A

3: Join colour B to any corner. Ch3, dc twice in the same corner, ch1, (3dc, ch2, 3dc) into the next corner, ch1, 3dc into the next corner.

4: ch4 (counts as first dc and ch1), turn, 3dc in the first ch1 space, ch1, (3dc, ch2, 3dc) into the ch2 space, ch1, 3dc into the next ch1 space, ch1, dc into the top of the turning chain. End B

5: Join colour C the the last ch1 from the previous row. Ch3, 2dc in the same ch1 space, ch1, 3dc in the next ch1 space, ch1, (3dc, ch2, 3dc) into the corner ch2 space, ch1, 3dc in the next ch1 space, ch1, 3dc into the last ch1 space.

6: ch4, turn, *3dc in the next ch1 space, ch1*, repeat from ** once more, (3dc, ch2, 3dc) into the ch2 space, *ch1, 3dc into the next ch1 space* repeat from ** once more , ch1, dc into the top of the turning chain.

7: ch3, turn, 2dc in the same space, *ch1, 3dc in the next ch1 space*, repeat from ** once more, ch1, (3dc, ch2, 3dc) into the corner ch2 space, *ch1, 3dc in the next ch1 space*, repeat from ** twice more. End Colour C.

8: Join colour A to the top of the last dc from previous round, ch4, turn, *3dc in the next ch1 space, ch1*, repeat from ** twice more, (3dc, ch2, 3dc) into the ch2 space, *ch1, 3dc into the next ch1 space* repeat from ** twice more , ch1, dc into the top of the turning chain.

9: ch3, turn, 2dc in the same space, *ch1, 3dc in the next ch1 space*, repeat from ** twice more, ch1, (3dc, ch2, 3dc) into the corner ch2 space, *ch1, 3dc in the next ch1 space*, repeat from ** three more times.

10: ch4, turn, *3dc in the next ch1 space, ch1*, repeat from ** 3 times, (3dc, ch2, 3dc) into the ch2 space, *ch1, 3dc into the next ch1 space* repeat from ** 3 times , ch1, dc into the top of the turning chain.

11: ch3, turn, 2dc in the same space, *ch1, 3dc in the next ch1 space*, repeat from ** 3 times, ch1, (3dc, ch2, 3dc) into the corner ch2 space, *ch1, 3dc in the next ch1 space*, repeat from ** 4 more times. End colour A

12: Join colour B to the top of the last dc from the previous row. ch4, turn, *3dc in the next ch1 space, ch1*, repeat from ** 4 times, (3dc, ch2, 3dc) into the ch2 space, *ch1, 3dc into the next ch1 space* repeat from ** 4 times , ch1, dc into the top of the turning chain.

13: ch3, turn, 2dc in the same space, *ch1, 3dc in the next ch1 space*, repeat from ** 4 times, ch1, (3dc, ch2, 3dc) into the corner ch2 space, *ch1, 3dc in the next ch1 space*, repeat from ** 5 more times.

14: ch4, turn, *3dc in the next ch1 space, ch1*, repeat from ** 5 times, (3dc, ch2, 3dc) into the ch2 space, *ch1, 3dc into the next ch1 space* repeat from ** 5 times , ch1, dc into the top of the turning chain.

15: ch3, turn, 2dc in the same space, *ch1, 3dc in the next ch1 space*, repeat from ** 5 times, ch1, (3dc, ch2, 3dc) into the corner ch2 space, *ch1, 3dc in the next ch1 space*, repeat from ** 6 more times.

16: ch4, turn, *3dc in the next ch1 space, ch1*, repeat from ** 6 times, (3dc, ch2, 3dc) into the ch2 space, *ch1, 3dc into the next ch1 space* repeat from ** 6 times , ch1, dc into the top of the turning chain. End colour B

17: Join colour C to any corner. Ch3, (dc2, ch2, dc3) in the same corner, *ch1, 3dc in the next ch1 space*, repeat 6 times, (3dc, ch2, 3dc) into the next corner, *ch1, 3dc in the next ch1 space*, repeat 6 times, (3dc, ch2, 3dc) into the next corner, *ch1, 3dc in the next ch1 space*, repeat 6 times, (3dc, ch2, 3dc) into the next corner, *ch1, 3dc in the next ch1 space*, repeat 6 times, join to the top of the starting chain. End colour C

18: Join colour A to any corner. Ch3, (dc2, ch2, dc3) in the same corner, *ch1, 3dc in the next ch1 space*, repeat 7 times, (3dc, ch2, 3dc) into the next corner, *ch1, 3dc in the next ch1 space*, repeat 7 times, (3dc, ch2, 3dc) into the next corner, *ch1, 3dc in the next ch1 space*, repeat 7 times, (3dc, ch2, 3dc) into the next corner, *ch1, 3dc in the next ch1 space*, repeat 7 times, join to the top of the starting chain. End colour A.

Weave in all ends.