Friday, December 30, 2011

Free Crochet Pattern - Little Clusters


Good morning all,

Today's pattern is for a sweet little cluster stitch hat. Made as instructed this hat will fit a baby at 26 weeks gestation. It is a simple and easy hat and takes minutes to make. The Little Clusters hat is a  great stashbuster too as it uses very little yarn.


Little Clusters Hat
4.00mm Hook
DK weight yarn (baby and sports will also work but will yield varying sizes)


1: ch2, sc into the 1st chain 8 times. join to the first stitch. (8)

2: ch2, 2 hdc in each stitch around, join (16)

3: ch2, *hdc in the next stitch, 2 hdc in the next stitch*  Repeat around, join. (24)

4: Repeat row 3. (36)

5: ch3, dc in the same spot. *ch1, skip 1 stitch, 2dc in the next stitch* Repeat around. join to 3rd chain in starting chain. (36)

6-8: slst into the next ch1 space, ch3, dc in the same spot. *ch1, 2dc in the next ch1 space* Repeat around. join to 3rd chain in starting chain. (36)

9-12. ch1, sc in each stitch around (36)


This pattern was revised and updated on 18/04/15

Thursday, December 29, 2011

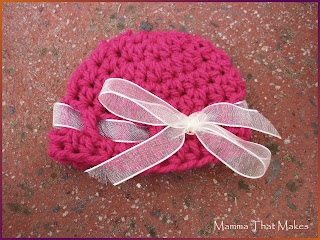
Crochet pattern - Ribbons n Bows - Angel Hat

Earlier in the year I was made aware of some very dedicated groups on Facebook that provide not only services, but hats, blankets, wraps and hats to the parents of angel babies. What is an angel baby you ask? A baby that was taken far too soon. Regardless of how, a child that left this Earth well before their time. One of the first patterns I ever designed was for L.A.M.B (more on them and others below pattern) and have since drafted a bunch of patterns for these tiny little angels. Its been a while since I made one, and Ive been whipping up a bunch of hats this week for them, I figure I should write down as I go so you too can make wee hats to donate. Angel and micro preemie hats are quick to make, but the satisfaction you feel lasts forever, and you can be sure that your item has been much appreciated by a grieving family.

http://www.ravelry.com/patterns/library/ribbons-n-bows Here is the link to the Rav page if you would like to add a project. Please do, I enjoy seeing your created pieces!


Ribbons n Bows Hat

4.00mm hook
DK weight yarn (I cannot tell you what I used, it was kindly donated)
Some thin organza or satin ribbon.

Either make a magic loop or ch2.

1. Do 8 sc into the 1st ch or the magic circle. Sl st to join.

2. ch2, hdc in the same spot as the ch2, do 2 hdc in each st around. sl st to join.

3. ch2, *hdc in the next st, 2 hdc in the next st* Repeat around, sl st to join.

4. ch2, *hdc in the next 2 st, 2 hdc in the next st* Repeat around, sl st to join.

5. ch2, hdc in each st around, sl st to join

6-7. Repeat 5.

8. ch4 (counts as first dc and ch1) *skip the next st, dc into the next, ch1* Repeat around, sl st to join.

9. ch2, hdc in each st and ch1 gap around. sl st to join. Finish off and weave in ends.

Take a piece of ribbon and thread it in and out of the gaps made by the dc row. Tie into a bow loosely. (It helps here to place something inside the hat when tying the bow so you do not pull the hat in)

My hat measures when flat 3.5 inches or 9cm wide, and 2.5 inches or 6.5cm tall. This would fit around the 26 weeks gestation mark, maybe a little smaller, however do not worry if yours is larger or smaller. These organisations need all sizes of hats.


This is a NOT FOR PROFIT pattern. Charity/Personal use ONLY. 

Credit where credit is due. A link if you make one and post the image helps people find these patterns. 

To see more of my patterns check out http://www.ravelry.com/designers/myshelle-cole

Tuesday, December 27, 2011

Crochet pattern - Barbie Garden Dress

My girls all got Barbies today, they bought them with Nanna's Christmas money and of course, they straight away ask if Mummy can make some clothes. Because really, thats what Barbie is all about. Dressing them up and creating elaborate scenes. I downright refuse to pay the outrageous amount the stores charge for one dress so I set about making some. I realised right away that there were 2 factors when it comes to dolls clothes for kids.

1. Sleeves suck. Kids get really grumpy really fast if they have to spend half an hour wrestling Barbie into her tinsy tiny outfit. You will be met with a never ending chorus of "Muuuuuuuum can you help?"

2. Tops without sleeves need a way to stay up. Preferably on their own as little fingers struggle with buttons and velcro + yarn can get messy.

I went with rubber bands. Yup, the secret to making a Barbie wardrobe any little girl will coo over is rubber bands. Hair elastics if you have them work too. They help dresses stay on, slide up and even the little little girls can drag an outfit on without getting frustrated at it. All you need to do is crochet the initial row around one!

Once you have the basics down you can go nuts with these dresses, trust me there's nothing to it. But for the people who need a pattern to follow, the next few weeks Ill be adding a bunch of fun dresses and variations. So grab some rubber bands, yarn and sparklie things and go forth and make the little princess in your life super happy!


This pattern is UNTESTED. Ive made it myself, but noone else has yet so please let me know if you get stuck. Id love to see what you made, so feel free to add project pages on Ravelry for this dress. Be sure to rate it too.  Ravelry page here: http://www.ravelry.com/patterns/library/garden-party-dress---barbie


Garden Party Dress

3.50mm Hook
DK weight yarn. I used Homemaker from Kmart
1 small button or bow or bead for the belt.
Scrap of alt colour for belt.
A rubber band that fits snug around your dolls bust. Mine was 1.5 inch, or 4cm in diameter. 

join yarn to rubber band with a sl st.

22sc around the rubber band, sl st to first to create a circle.

Ch2. hdc in each st around, join

ch2, hdc in each st around, join

ch2, hdc, hdc2tg, hdc x 3, hdc2tg, hdc x 3, hdc2tg, hdc x 3, hdc2tg, hdc to end. Join.

ch1, sc around (you can choose to join these rounds or use a stitch marker to continue until the sc rows end)

sc in ach st around

sc in each st around

ch2, *hdc, 2hd in next* Repeat from * to * around. Join 

ch2, hdc in each st around, join 

ch2, *hdc, 2hd in next* Repeat from * to * around. Join

ch2, hdc in each st around, join 

ch2, *hdc x 3, 2hdc in next* Repeat from * to * around. Join

ch3, dc in each st around, join

ch3, dc in each st around, join  Fasten of and weave in ends. 

Belt. 
Ch28, sc in 2nd ch from hook and each across. finish off leaving long tail.
Wrap belt around dress middle and sew ends together then stitch belt to dress, stitch loosely so belt slides easily over dolls hips. 

Credit where credit is due please. Make as many as you want but dont repost and dont claim its your own, thats just insulting. Linkback would be great too

Barbie Wardrobe Collection

Barbie Wardrobe. Round-UP

Monday, December 5, 2011

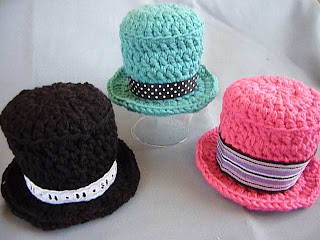
Mini Tophat Crochet Video Tutorial

Hello peeps!

I had hoped to have this up earlier in the day, but well. It was a royal pain in the behind to edit, merge and then upload. All 6.9GIG of it :O

Anyway, this is indeed my very first vid tut for a cute mini tophat, crocheted. I hope you all enjoy it. Ill add a typed version  to Ravelry tomorrow so you can download it, and add project pages, because I just love seeing what everyone creates. I'm pretty proud of this, both the pattern and the tutorial. So many possibilities with them too!

Hmm . I am not sure how to insert a video here, so we'll suffice with a photo and a link!


Watch the video HERE


Ravelry Page Here

UPDATE: 19th Feb 2012
Here is the written pattern. I am sorry it took so long, I was just disheartened because someone decided to write it down exactly and profit from the pattern as their own on another site. Shame on you.
joins at the end are done into the chain that started the row.


To start : chain 4 and join to form a ring.

Row 1 : chain 3, then work 10 dc's into the ring.

Row 2: ch3, dc in same spot. 2dc in each st around, join

Row 3: ch3, dc in same st. *dc, dc, 2dc same* repeat round, join

Row 4: ch3, dc in each dc round, BACK LOOP ONLY, join

Row 5:-6: dc in each st around, join

Row 7: ch3, dc2tg, *4dc, dc2tg* around, join

Row 8: ch3, dc in each st around, join

Row 9: ch2, 2hd into the front loop of each st around

Row 10: ch2, hdc same, hdc 2 times *2hdc same, hdc, hdc* repeat around, join. Finish off, weave in ends.

Ive decorated these in many ways, bows and ribbons, flowers, chains, go nuts with them. Please tho, do share a picture on Ravelry, I love seeing how people make things!